Part 1: The World of Succulents: More Than Just a Plant
Welcome to the definitive guide to succulent care. Whether you are a first-time plant owner drawn to their sculptural beauty or an experienced gardener looking to master these resilient plants, this resource provides everything you need for success. Succulents are more than just a low-maintenance trend; they are a testament to nature’s ingenuity, embodying survival and beauty in one package. This guide will walk you through every aspect of their world, from understanding their fundamental biology to advanced propagation techniques and creative design ideas. By the end, you will not only know how to care for your succulents—you will understand them.
What Truly Defines a Succulent?
The term “succulent” can be misleading. It does not refer to a single, genetically related plant family like orchids or roses. Instead, it is a broad, descriptive category awarded to any plant from any scientific family that has evolved a remarkable survival strategy: the ability to store water in its own tissues. The name itself offers the best clue, deriving from the Latin word succulentus, which means “juicy”. This adaptation allows them to thrive in arid climates where other plants would quickly perish.
Beyond the Look: The Science of Water Storage
The defining characteristic of a succulent is the presence of specialized water-storage tissues that make its leaves, stems, or roots appear thick, fleshy, and engorged. This internal reservoir allows the plant to remain plump and hydrated even during long periods of drought and high internal temperatures. Some species have perfected this ability to such a degree that their water content can reach an astonishing 90–95%. This stored water can be held in various structures:
- Leaf Succulents: Many popular varieties, like Echeveria and Aloe, store the majority of their water in their leaves, making them appear swollen and full.
- Stem Succulents: Cacti are the most famous example of stem succulents. Lacking traditional leaves, they store water in their thickened, fleshy stems, which also perform photosynthesis.
- Root Succulents: Some plants, known as geophytes, store water in underground organs like a caudex or tuberous roots, allowing them to die back to the ground and survive unfavorable conditions.
Masters of Survival: Unique Adaptations for Arid Climates
A succulent’s ability to store water is just one piece of a highly integrated survival system. Every aspect of its form and function is a direct evolutionary response to the challenge of water scarcity.
- Crassulacean Acid Metabolism (CAM) Photosynthesis: Perhaps the most brilliant adaptation is a specialized form of photosynthesis. Most plants open their pores, called stomata, during the day to take in carbon dioxide ($CO_2$), but this results in significant water loss through evaporation. To combat this, many succulents work the night shift. They keep their stomata tightly closed during the hot, dry day and open them only in the coolness of night to absorb $CO_2$. This $CO_2$ is then chemically stored. When the sun rises, the stomata snap shut, and the plant uses the stored $CO_2$ and sunlight to photosynthesize, minimizing water loss. This highly efficient process is also why succulents tend to grow much more slowly than other plants.
- Strategic Root Systems: Many succulents possess shallow, wide-spreading root systems that act like a net just below the soil surface. This allows them to maximize water absorption from even the lightest showers or heavy dew, capturing moisture before it evaporates.
- Defensive and Protective Features: The outer surface of a succulent is its first line of defense. A thick, waxy layer called the cuticle provides an impervious barrier, protecting the soft, water-filled tissues inside. Furthermore, features like spines (modified leaves) or fine hairs are not just for protection against predators; they also create a micro-habitat of still air around the plant, reducing the drying effects of wind and providing crucial shade from the intense sun.
- Shape and Form: The iconic shapes of succulents are a masterclass in physics. Compact, rounded, spherical, or columnar growth forms all serve to reduce the plant’s surface-area-to-volume ratio. A lower ratio means less surface area is exposed to the sun and wind, which dramatically minimizes water loss through evaporation and helps the plant stay cool.
Succulent vs. Cactus: Solving the Great Botanical Riddle
One of the most common points of confusion for new plant enthusiasts is the distinction between succulents and cacti. The relationship is best understood with a simple, memorable rule.
The Golden Rule
The fundamental principle to remember is: All cacti are succulents, but not all succulents are cacti. This means that cacti are a specific family of plants (Cactaceae) that falls under the much broader descriptive umbrella of “succulent”. Think of it like squares and rectangles; all squares are rectangles, but not all rectangles are squares.
The Telltale Sign: Identifying Areoles
While there are several differences, there is one single, definitive feature that separates a cactus from all other succulents: the areole. Areoles are small, fuzzy, cushion-like bumps on the surface of a cactus from which spines, flowers, and new branches emerge. If a plant has areoles, it is a cactus. If it lacks areoles, it is another type of succulent, even if it has spines (like some Euphorbia species).
Other Key Differences
Beyond the presence of areoles, a few other general characteristics can help distinguish cacti from other succulents.
Feature | Cacti | Other Succulents |
Leaves | Almost always absent. The fleshy stem performs photosynthesis and stores water. | Usually present. Water is typically stored in thick, fleshy leaves (e.g., Echeveria, Aloe). |
Spines | Emerge from areoles. They are modified leaves. | May have thorns or spines, but they do not grow from areoles. |
Flowers | Often large, showy, and structurally complex to attract pollinators like bats and birds in vast desert landscapes. | Typically smaller and less complex, pollinated by insects like bees and butterflies. |
Fruit | Produce fleshy, often edible fruit after flowering (e.g., prickly pear, dragon fruit). | Flowers develop into seed pods, not fleshy fruit. |
Native Origin | Almost all species are native to the Americas, from North to South America. | Found on every continent except Antarctica, in diverse habitats from deserts to coastlines and alpine regions. |
Why Welcome Succulents Indoors? The Surprising Benefits
Beyond their aesthetic appeal and low-maintenance nature, bringing succulents into your home or office offers a surprising number of tangible benefits for your health and well-being.
Natural Air Purifiers and Humidifiers
Like all plants, succulents improve indoor air quality through photosynthesis, absorbing carbon dioxide and releasing the oxygen we need to breathe. What makes many succulents special is their use of CAM photosynthesis. Because they continue to exchange gases at night, they produce oxygen around the clock, creating a fresher environment 24/7. As they transpire, they also release water vapor from their leaves, acting as gentle, natural humidifiers that can help combat the dry air produced by heating and air conditioning systems.
A Boost for Mental Wellness and Productivity
The simple act of caring for plants has been scientifically shown to have a positive impact on mental health. Tending to succulents can lower stress markers like blood pressure and pulse rate, improve mood, and provide a sense of accomplishment. Studies have also found that the presence of plants in a workspace can enhance concentration, memory retention, and overall productivity by as much as 12%, making a small succulent the perfect desk companion to help you through an afternoon slump.
Medicinal Properties
Certain succulent species have been used for their medicinal properties for centuries. The most famous example is Aloe vera. The gel found inside its thick leaves contains compounds that can help soothe minor cuts, burns, and sunburns, making it a living first-aid kit for your kitchen windowsill.
Low-Maintenance Appeal
Perhaps the most celebrated benefit is their ease of care. Because they are adapted to survive long periods of drought, they “thrive on neglect” and are incredibly forgiving of occasional forgetfulness. This makes them the ideal plant for busy professionals, beginners who are still developing a “green thumb,” or anyone who travels frequently.
Part 2: The 5 Pillars of Succulent Care: Your Foundation for Success
Successful succulent cultivation is not about following a rigid set of rules but about understanding and balancing five key environmental factors. These five pillars—Light, Water, Soil, Temperature/Humidity, and Fertilizer—are interconnected elements of a single ecosystem. Mastering them means you are no longer just a plant owner; you are the manager of a thriving habitat. Adjusting one pillar, such as moving a plant to a brighter spot, will inevitably affect the others, like how often it needs water. This holistic approach is the true secret to long-term success.
Pillar 1: Light – The Energy Source
Light is the most critical factor for growing healthy, beautiful succulents indoors. It is their primary source of energy for photosynthesis, and getting it right is essential for maintaining their compact shape and vibrant colors.
Decoding Light
Understanding the terminology used to describe light is the first step.
- Direct Sun: This is unfiltered sunlight, like the kind a plant would receive outdoors. Indoors, this is typically found for a few hours a day right in front of an unshaded south- or west-facing window.
- Bright, Indirect Light: This is the ideal for most indoor succulents. It refers to a location that is very bright but where the sun’s rays are filtered by a sheer curtain, or the spot is just outside the direct path of the sun. A simple way to test for it is the “shadow test”: place a piece of paper in the spot. If your hand casts a sharp, clearly defined shadow, the light is direct. If it casts a softer, slightly blurry shadow, the light is bright and indirect. If the shadow is very faint, the light is low.
- Low Light: This refers to a spot far from a window or in a room with a north-facing window, where no direct sunlight ever reaches. While a few succulents like Haworthia can tolerate low light, most will not thrive.
Finding the Perfect Spot
Most succulents require a minimum of six hours of bright, indirect light per day. Indoors, the best location is typically near a south-facing window, which provides bright light for most of the day. An east-facing window, which gets gentler morning sun, is also an excellent choice. A west-facing window can work, but be cautious of intense afternoon sun, which can scorch the leaves. To prevent lopsided growth, it is important to rotate your plants every few weeks so all sides receive equal light exposure.
Reading the Signs
Your succulent will give you clear visual cues if its lighting is not right.
- Etiolation (Stretching): This is the most common symptom of insufficient light. The plant will begin to stretch and elongate, creating unnatural, large gaps between its leaves. It may also become pale and start to lean or bend towards the nearest light source. This stretched growth is permanent.
- Sunburn: Too much intense, direct sunlight can be just as harmful as too little. Sunburn appears as permanent, irreversible brown, black, or beige patches on the leaves where the plant’s tissues have been scorched.
When Nature Isn’t Enough: A Guide to Grow Lights
If your home lacks adequate natural light, a grow light is an essential tool. Modern LED and fluorescent grow lights can effectively supplement or even replace sunlight, allowing you to grow healthy succulents anywhere. For best results, look for lights with the following specifications:
- Intensity: The light needs to be powerful enough. Aim for a fixture that provides at least 2,000 lumens per square foot of growing space.
- Color Temperature: Plants use the full spectrum of light for photosynthesis. Choose a “full-spectrum” bulb with a color temperature between 5,000 and 6,500 Kelvins (K), which closely mimics natural daylight.
- Duration: Set your grow lights on a timer to run for 12 to 16 hours per day. This consistent cycle provides the energy the plants need while also giving them a necessary “dark” period.
- Placement: Position the lights 6 to 12 inches above the tops of your plants. Too far, and the light will be too weak; too close, and you risk burning the leaves. High-output (HO) T5 fluorescent tube lights are a highly recommended, energy-efficient, and effective option for succulent growers.
Pillar 2: Water – The Art of “Soak and Dry”
Overwatering is the single most common and fastest way to kill a succulent. These plants are adapted to infrequent but heavy rainfall in their native habitats. To replicate this, you must master one simple but crucial technique: the “soak and dry” method.
The Only Method You Need: Mastering “Soak and Dry”
Forget watering on a rigid schedule. The “soak and dry” method is the only technique you need. The process is straightforward:
- Soak: When it is time to water, drench the soil completely until water flows freely from the pot’s drainage hole. This ensures the entire root system has access to moisture.
- Dry: After soaking, allow the soil to dry out completely from the top of the pot to the bottom. This “drought” period is critical, as it allows the roots to breathe and encourages them to grow deeper in search of moisture, creating a stronger plant. Do not water again until the soil is bone dry.
It is critical to avoid using a spray bottle to water mature succulents. Misting only wets the top layer of soil, which encourages a weak, shallow root system. It also leaves water droplets on the leaves, which can lead to fungal diseases and rot.
Top-Down vs. Bottom-Up: Which Watering Technique is Best?
There are two excellent ways to execute the “soak” part of the method.
- Top Watering: This is the most common method. Simply pour water onto the soil surface, avoiding the leaves as much as possible, until it drains from the bottom of the pot. Discard any excess water that collects in the saucer after a few minutes.
- Bottom Watering: This is an ideal method for preventing water from accumulating on the leaves. Place the pot in a sink or tray filled with a few inches of water. Allow the pot to sit for 10 to 30 minutes as the soil absorbs water up through the drainage hole. Once the top of the soil is visibly moist, remove the pot and let it drain completely.
How Often to Water: It’s Not About a Schedule
There is no universal watering schedule that works for every succulent. The frequency of watering depends entirely on the plant’s environment: a succulent in a hot, sunny window will need water far more often than one in a cooler, lower-light spot. Indoors, many growers find a frequency of every 14 to 21 days is a good starting point, but the golden rule is to check the soil, not the calendar. Stick your finger or a wooden skewer an inch or two into the soil. If you feel any moisture or if soil clings to the skewer, wait longer before watering.
Signs of Thirst vs. Drowning
Your plant will tell you when it is thirsty or has had too much to drink.
- Underwatering: The leaves will begin to look wrinkled, puckered, or shriveled. They will feel soft and deflated to the touch instead of firm. This is easily fixed with a thorough watering.
- Overwatering: This is far more dangerous. The leaves will appear swollen, soft, and mushy. They may turn yellow or translucent and will often fall off at the slightest touch. This indicates that root rot has likely set in.
Pillar 3: Soil – The Critical Root Environment
The soil you use is just as important as your watering habits. Succulent roots need to breathe, and using the wrong soil mix is a guaranteed path to root rot.
Why Regular Potting Soil is a Death Sentence
Standard indoor potting soil is engineered to retain moisture for thirsty tropical plants. For succulents, this is a fatal flaw. The dense, organic material holds too much water for too long, suffocating the roots by depriving them of oxygen and creating the perfect environment for rot to develop. The ideal succulent soil must have two key properties: excellent drainage and plenty of aeration.
Choosing a Commercial Mix
The easiest option for beginners is to purchase a pre-bagged commercial mix specifically formulated for succulents and cacti. These mixes contain amendments like sand, perlite, or pumice to increase porosity and ensure water drains quickly.
The Perfect DIY Succulent Soil: Expert Recipes and Ratios
Creating your own soil mix gives you complete control over the quality and drainage, and it is often more cost-effective. The principle is to balance organic components (which provide some nutrients) with inorganic, gritty components (which provide drainage and aeration).
- Simple Beginner’s Recipe: This is a great starting point. Mix one part standard potting soil with one part inorganic grit, such as coarse sand, perlite, or pumice.
- Advanced Gardener’s Recipe: For superior performance, use a ratio of 3 parts potting soil, 2 parts coarse sand, and 1 part perlite or pumice.
- Soil-less Professional Mix: For maximum drainage and aeration, especially in humid climates, you can create a mix without any traditional soil. A good recipe is 1 part coconut coir (a sustainable alternative to peat moss), 2 parts pumice, and optional additions like orchid bark or horticultural charcoal.
A Note on Amendments:
- Pumice: A volcanic rock that is porous and lightweight. It is considered superior to perlite because it is heavier and does not float to the top of the soil over time.
- Perlite: A volcanic glass that is heated until it expands, creating a very lightweight, porous material. It is excellent for aeration.
- Coarse Sand: Do not use play sand or beach sand, which is too fine. Use horticultural sand or builder’s sand to create air pockets in the soil.
- Coconut Coir: A fibrous material from coconut husks that retains some moisture but rewets easily and resists compaction.
Pillar 4: Temperature & Humidity – Mimicking Native Conditions
Succulents are generally not fussy about temperature and humidity, and most will thrive in the conditions found in a typical home. However, understanding their preferences and protecting them from extremes is key to their long-term health.
The Ideal Temperature Sweet Spot
Most succulents are comfortable in the same temperatures we are. The ideal range is generally between 60°F and 80°F (15°C to 27°C). They can tolerate a broader range, from as low as 45°F to as high as 85°F, and often benefit from slightly cooler nighttime temperatures, which mimics their natural desert habitat.
Humidity: Why Less is More
Succulents are native to arid or semi-arid regions and are well-adapted to dry air. They prefer a relatively low humidity level, ideally in the 40% to 50% range. The average home, especially in winter when heating is on, typically falls within this range. High humidity (above 60%) can be problematic, as it slows the evaporation of water from the soil, increasing the risk of root rot. For this reason, you should never mist your succulents; it provides no benefit and can promote fungal growth on the leaves.
Protecting Plants from Frost and Extreme Heat
While hardy, succulents have their limits.
- Frost: The vast majority of common succulents are not frost-tolerant. When exposed to freezing temperatures, the water stored in their fleshy cells expands, rupturing the cell walls and causing irreversible damage that appears as black, mushy tissue. Tender succulents should be brought indoors or protected whenever temperatures are forecast to drop below 40°F (4°C).
- Extreme Heat: While they are sun-lovers, succulents can be damaged by extreme heat, especially when combined with intense, direct sunlight. Temperatures consistently above 90°F (32°C) can cause the plant’s leaves to burn or even “cook” from the inside out. During heatwaves, it is wise to provide some afternoon shade for outdoor plants.
Pillar 5: Fertilizer – A Light Touch for Low-Maintenance Plants
In their natural habitats, succulents are accustomed to growing in nutrient-poor, gritty soils. This means they have very low fertilizer requirements, and a light-handed approach is always best.
Do Succulents Even Need Fertilizer?
For the most part, succulents do not require regular fertilization to survive. They will be perfectly “fine” without it. However, providing a small amount of nutrients during their active growing season can result in more vigorous growth, healthier foliage, and more prolific flowering, elevating your plants from “fine” to “glorious”. Do not fertilize succulents that you wish to keep small and compact, such as those in terrariums or wreaths.
Choosing the Right Formula (NPK Ratios)
When selecting a fertilizer, pay attention to the N-P-K ratio (Nitrogen-Phosphorus-Potassium).
- Avoid high-nitrogen fertilizers. Nitrogen promotes leafy growth, and too much can cause succulents to become weak, stretched, and susceptible to rot.
- A balanced, water-soluble fertilizer is a good choice. Look for one with an NPK ratio where the numbers are equal, such as 10-10-10.
- Alternatively, a formula that is lower in nitrogen and slightly higher in phosphorus (the “P” in NPK) can be beneficial, as phosphorus supports strong root development and flowering.
Feeding Schedule: When and How to Fertilize
Timing and dilution are everything when it comes to feeding succulents.
- When to Fertilize: Only feed your succulents during their active growing season, which for most is spring and summer. Stop fertilizing in the fall and do not feed at all during their winter dormancy period.
- How to Apply: Always dilute your fertilizer to 1/4 or 1/2 the strength recommended on the product label. This is the most important rule to prevent “fertilizer burn,” which can damage the plant’s delicate roots.
- Frequency: Apply the diluted fertilizer solution to the soil (not the leaves) about once every 4 to 6 weeks during the growing season only.
Part 3: Advanced Care: Pruning, Cleaning, and Repotting
Once you have mastered the five pillars of basic care, you can move on to the maintenance practices that will keep your succulents looking their best for years to come. Pruning and repotting are not just about aesthetics; they are proactive health measures that encourage strong, compact growth and prevent future problems. These actions are a form of strategic intervention, redirecting the plant’s finite energy away from unproductive parts—like dead leaves or spent flowers—and channeling it toward vibrant, new growth. This not only improves the plant’s appearance but also enhances its overall vitality and resilience.
A Guide to Pruning: Encouraging Healthy, Compact Growth
Pruning is a simple process that can rejuvenate an overgrown or untidy succulent, promoting a healthier and more attractive plant.
Why Prune?
There are several key reasons to prune your succulents:
- To Remove Dead or Diseased Parts: Snipping off dead leaves or spent flower stalks improves the plant’s appearance and removes potential hiding spots for pests like mealybugs.
- To Control Size and Shape: Pruning helps maintain a desired size and encourages a bushier, more compact growth habit.
- To Correct Leggy Growth: If a succulent has stretched out due to a lack of light (etiolation), pruning is the only way to restore a compact form.
Best Time to Prune
The ideal time to prune is during the plant’s active growing season in spring and summer. Pruning during this period allows the plant to heal quickly and put out new growth from the cut areas. Avoid major pruning in the winter when the plant is dormant.
Essential Tools
For clean cuts that heal quickly, always use the right tools.
- Sharp Shears or Scissors: For thicker stems, use sharp pruning shears. For more delicate stems or fine-tuning, floral snips or sharp scissors work well.
- Sterilization: This step is crucial. Before and after pruning, wipe the blades of your tools with rubbing alcohol to prevent the spread of bacteria and disease between plants.
Techniques
- Removing Dead Leaves: As succulents grow, it is natural for the lowest leaves to dry up and wither. These can usually be gently pulled off by hand. This “cleaning” improves air circulation around the base of the plant.
- Deadheading Flowers: After your succulent has finished blooming and the flowers have faded, it is best to remove the entire flower stalk. Use your sterile shears to cut the stalk off as close to the base of the plant as possible. This prevents the plant from wasting energy on seed production and redirects it back into growing healthy leaves and roots.
- Trimming Leggy Stems: For a plant that has become stretched and “leggy,” use your shears to cut the stem at your desired height, typically just above a set of leaves. This “beheading” technique leaves you with two parts: the top rosette, which can be propagated into a new plant (see Part 4), and the bare stem in the pot, which will often sprout multiple new heads from the sides.
Repotting Your Succulent: When and How to Give It a New Home
Repotting provides your succulent with fresh, nutrient-rich soil and gives its roots more room to grow. It is a necessary task every few years to ensure continued health.
When to Repot
Look for these clear signs that it is time to repot:
- The plant has become root-bound, with roots growing out of the pot’s drainage hole or forming a dense, tangled mass.
- The plant has outgrown its current pot and is becoming top-heavy or unstable.
- The soil has become compacted and drains poorly, or it has been several years and the soil is likely depleted of nutrients.
- You suspect root rot and need to inspect the roots and provide fresh, dry soil.
As a general rule, most slow-growing succulents will need to be repotted every 2 to 4 years.
Step-by-Step Guide
- Choose the Right Pot: Select a new pot that is only 1 to 2 inches larger in diameter than the old one. A pot that is too large will hold excess soil and moisture, increasing the risk of rot. An unglazed terracotta pot is an excellent choice as its porous nature helps the soil dry out faster. Most importantly, ensure the new pot has at least one drainage hole.
- Gently Remove the Plant: Turn the old pot on its side and gently tap it to loosen the soil. Carefully slide the succulent out. If it is stuck, you can run a knife around the inside edge of the pot.
- Inspect and Clean the Roots: Gently brush away as much of the old, depleted soil from the root ball as you can. Take this opportunity to inspect the roots. Healthy roots are typically white or light tan and firm. If you see any roots that are black, brown, and mushy, this is a sign of rot. Use your sterile shears to trim these away.
- Repot the Succulent: Place a small amount of fresh, dry succulent soil mix in the bottom of the new pot. Center the plant in the pot at the same depth it was growing previously. Fill in around the roots with more soil, gently firming it down to eliminate large air pockets.
- Wait to Water: This is a critical final step. Do not water the newly repotted succulent for at least 3 to 5 days, or even up to a week. This waiting period allows any roots that were bruised or broken during the process to heal and callous over, preventing them from rotting when you do water.
Part 4: Expanding Your Collection: The Magic of Propagation
One of the most rewarding aspects of growing succulents is how easily they can be propagated, allowing you to create new plants for free to expand your collection or share with friends. The process might seem like magic, but its success hinges on a single, critical biological principle: wound healing. Every method of propagation involves creating a wound on the plant’s tissue. Before this wound is exposed to the moisture in soil, it must be allowed to dry and form a protective “callus.” This simple, non-negotiable step is the foundation of the entire process, as it seals the wound and prevents the water-rich cutting from absorbing too much moisture and succumbing to rot. Patience during this callousing phase is the key to a high success rate.
Method 1: Propagating from Leaves
This method works best for succulents with fleshy, easily detachable leaves, like Echeveria, Sedum, and Graptopetalum.
- Select a Healthy Leaf: Choose a full, plump, and healthy-looking leaf from the parent plant. Avoid any leaves that are damaged, shriveled, or discolored.
- Remove it Correctly: This is the most important step. Grasp the leaf firmly and gently twist it from side to side until it pops cleanly off the stem. You must get a “clean pull” that removes the entire base of the leaf where it connected to the stem. If any part of the leaf base is torn or left behind, it will not be able to produce new growth.
- Callous Over (Crucial Step): Lay the removed leaves on a paper towel in a location that is dry and out of direct sunlight. Leave them alone for 3 to 5 days. During this time, the wound at the base of the leaf will dry out and form a hard callus. Do not skip this step, or your leaves will rot.
- Place on Soil: Fill a shallow tray or pot with well-draining succulent soil. Lay the calloused leaves flat on top of the soil. You do not need to bury the ends.
- Wait and Mist: Place the tray in a spot with bright, indirect light. Do not water the leaves at all until you see tiny pink or white roots beginning to sprout from the calloused end, which can take a few weeks. Once roots appear, you can lightly mist the soil around the roots with a spray bottle every few days, just enough to keep them from drying out.
- Watch for Pups: Soon after the roots appear, a tiny new rosette, or “pup,” will begin to form at the base of the leaf. The original “mother leaf” will continue to provide nutrients and water to the new baby plant. Over several weeks or months, the mother leaf will slowly shrivel up and eventually fall off on its own. Do not remove it prematurely. Once the new plant is about an inch in diameter and has a healthy root system, it can be carefully transplanted into its own pot.
Method 2: Propagating from Stem Cuttings (“Beheading”)
This method is ideal for branching succulents or for fixing plants that have become leggy.
- Take a Cutting: Using a clean, sharp pair of scissors or a knife, cut a section of stem that is 2 to 4 inches long. This is often the top rosette of a plant that has stretched out.
- Prepare the Stem: Gently remove the leaves from the bottom 1 to 2 inches of the stem, creating a bare section for planting. The leaves you remove can be used for leaf propagation.
- Callous Over: Place the cutting in a dry, well-ventilated area out of direct sunlight for 3 to 7 days. Wait for the cut end of the stem to dry completely and form a callus.
- Plant the Cutting: Fill a small pot with dry, well-draining succulent soil. Insert the calloused end of the stem about 1 to 2 inches deep into the soil, just enough for it to stand upright.
- Water Sparingly: Wait about two weeks after planting before you water for the first time. This gives the cutting time to start developing roots. After that, water only when the soil is completely dry. You can check for root growth by giving the cutting a very gentle tug; if you feel resistance, roots have formed. This typically takes 4 to 6 weeks.
Method 3: Propagating from Offsets (“Pups”)
Many succulents, such as Sempervivum, Aloe, and Haworthia, reproduce by sending out small, fully formed baby plants called offsets, pups, or chicks.
- Identify an Offset: Look for these miniature plants growing at the base of the mother plant or, in the case of “Hens and Chicks” (Sempervivum), at the end of a runner stem called a stolon.
- Separate Gently: It is best to wait until the offset is at least one-third the size of the parent plant to ensure it is mature enough to survive on its own. Use your fingers or a clean knife to gently separate the pup from the mother plant. Try to preserve as many of the pup’s own roots as possible during this process.
- Callous if Needed: If the separation created a moist wound on the offset, allow it to air dry for a day or two to form a callus. If it separated with its roots intact, this step may not be necessary.
- Pot Up: Plant the offset in its own small pot filled with well-draining succulent soil. Water it lightly and place it in a location with bright, indirect light until it becomes established.
Part 5: Troubleshooting: A Visual Guide to Common Succulent Problems
Even with the best care, you may occasionally encounter issues with your succulents. The good news is that most problems are not caused by diseases but are symptoms of an environmental imbalance that can be corrected. Think of yourself as a plant detective; by observing the visual cues, you can diagnose the problem and implement the right solution. This table is designed to be your go-to diagnostic tool.
Symptom | Visual Cue | Probable Cause | Immediate Action & Long-Term Solution |
Leaves are yellow, mushy, translucent, and fall off easily. Stem may be black/soft at the base. | [A description of an overwatered succulent with limp, yellow, almost transparent leaves.] | Overwatering / Root Rot | Immediate: Stop watering immediately. Unpot the plant and inspect the roots. Using sterile scissors, trim away any roots that are black, brown, or mushy. Allow the plant and its healthy remaining roots to air dry out of the soil for 2-3 days. Long-Term: Repot in a container with excellent drainage using fresh, completely dry, gritty succulent soil. Drastically reduce your watering frequency. Adopt the “soak and dry” method, only watering when the soil is 100% dry from top to bottom. |
Leaves are wrinkled, shriveling, soft, and feel deflated. | [A description of an underwatered succulent with puckered, raisin-like leaves.] | Underwatering | Immediate: Give the plant a thorough, deep watering. The bottom-watering method is excellent for rehydrating a very thirsty plant. The leaves should plump back up within a day or two. Long-Term: While succulents are drought-tolerant, they are not immortal. Monitor the soil more closely and water as soon as it has completely dried out. |
Stem is stretching, with large gaps between leaves. Plant looks pale and is leaning towards a window. | [A description of an etiolated succulent that has lost its compact shape and is tall and spindly.] | Insufficient Light (Etiolation) | Immediate: Move the plant to a location that receives more light. It is crucial to do this gradually over one to two weeks to acclimate the plant and prevent sunburn. Long-Term: Provide at least 6 hours of bright, indirect light daily. If natural light is insufficient, supplement with a grow light. The stretched growth is permanent; to restore a compact shape, you must prune the top (“behead”) and propagate it as a new plant. |
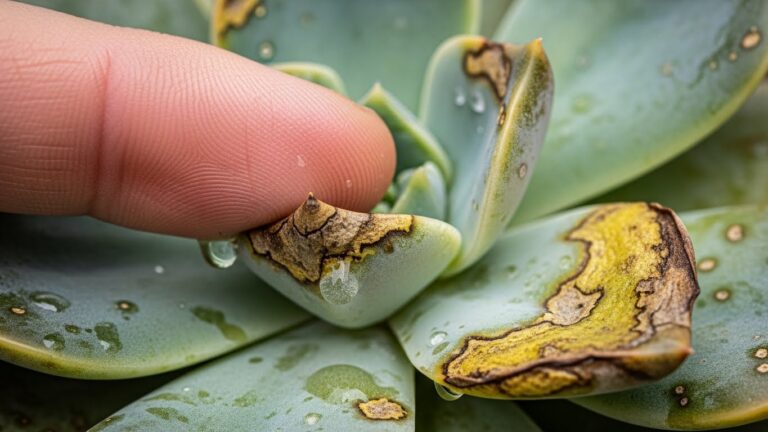
Dry, crispy brown, beige, or black patches on the tops of leaves exposed to the sun. | [A description of a succulent with distinct, scarred brown spots on its leaves.] | Sunburn (Too much direct, intense sun) | Immediate: Move the plant to a location with less intense sunlight, providing protection from harsh afternoon sun. Long-Term: Acclimate plants to direct sun slowly over several weeks. For indoor plants in very sunny windows, use a sheer curtain to filter the light. The burned spots are permanent scars but will not harm the plant further if the light conditions are corrected. |
White, cottony fluff is visible, especially in the crevices between leaves and on new growth. | [A description of mealybugs, which look like tiny bits of white cotton.] | Pest Infestation (Mealybugs) | Immediate: Isolate the infected plant to prevent the pests from spreading. Dip a cotton swab in 70% isopropyl alcohol and dab it directly onto the pests to kill them on contact. Long-Term: For larger infestations, spray the entire plant with a commercial insecticidal soap or neem oil, following the package directions. Improve air circulation around your plants to create a less hospitable environment for pests. |
Leaves are turning black or becoming mushy after exposure to cold temperatures. | [A description of a frost-damaged succulent with blackened, soft, and collapsing leaves.] | Frost Damage | Immediate: Bring the plant into a warmer, protected location immediately. Do not prune the damaged parts right away. Long-Term: Wait until spring to assess the full extent of the damage. The plant may recover, or some parts may die back. Once you see new growth, use sterile shears to prune off any tissue that is definitively dead and mushy. Protect tender succulents from temperatures below 40°F (4°C). |
Part 6: A Curated Guide to Popular Succulents
The world of succulents is incredibly diverse, with thousands of species offering an endless variety of shapes, colors, and textures. Here is a closer look at five iconic and readily available succulents that are perfect for starting or expanding your collection.
The Rosette Form: Echeveria elegans (Mexican Snowball)
- Description: This award-winning succulent is beloved for its tight, symmetrical rosettes of fleshy, spoon-shaped leaves that are a beautiful pale, silvery-green. In late winter and spring, it produces tall, slender, pinkish-red stems that bear charming, lantern-shaped pink flowers tipped with yellow. Echeveria elegans readily produces offsets, spreading over time to form a dense carpet of rose-like rosettes.
- Care: To maintain its compact, beautiful rosette shape, it requires at least six hours of bright light per day. It is not cold-hardy and should be protected from frost, thriving in USDA hardiness zones 9-12. Water using the “soak and dry” method, allowing the soil to dry out completely between waterings to prevent root rot.
The Architectural Form: Haworthia fasciata (Zebra Plant)
- Description: The Zebra Plant is instantly recognizable by its striking appearance. It forms rosettes of dark green, upright, pointed leaves that are covered in bumpy, horizontal white stripes, or “zebra” bands. It is a slow-growing and exceptionally easy-care plant, making it a perfect choice for beginners.
- Care: Unlike many other succulents, the Zebra Plant is an excellent choice for indoor growing because it thrives in lower light conditions. It prefers bright, indirect light; placing it in intense, direct sun can scorch its leaves, causing the tips to turn brown. It has a surprisingly long root system, so planting it in a deeper pot is beneficial for its health. Water thoroughly every 2-3 weeks during the summer growing season, and reduce watering to about once a month in the winter.
The Trailing Form: Sedum morganianum (Burro’s Tail)
- Description: A stunning trailing succulent, Burro’s Tail (or Donkey’s Tail) features long, cascading stems that are densely packed with plump, blue-green, teardrop-shaped leaves. It is a showstopper when grown in a hanging basket, where its tails can grow several feet long.
- Care: This plant needs plenty of bright light to thrive; without it, the stems will grow thin and the leaves will be sparsely spaced. The leaves are extremely delicate and will fall off at the slightest touch, so it is best to place it where it will not be disturbed. Water only when the soil is completely dry. The leaves will begin to look slightly shriveled or wrinkled when the plant is thirsty, providing a clear visual cue.
The Good Luck Charm: Crassula ovata (Jade Plant)
- Description: The Jade Plant is a classic houseplant that can live for generations, eventually growing into a small, tree-like shrub with a thick, woody trunk and branches. Its leaves are glossy, fleshy, and oval-shaped, resembling small coins.
- Symbolism: This succulent is steeped in cultural symbolism. It is widely known as the “Money Plant,” “Lucky Plant,” or “Friendship Plant”. In Feng Shui and many Asian cultures, it is believed to attract wealth, prosperity, and good fortune, making it a very popular housewarming gift. Placing it in the southeast “wealth corner” of a home is thought to enhance its positive energy.
- Care: Jade Plants need at least four to six hours of bright light daily to grow well. With high light exposure, the edges of the leaves may develop a beautiful red tinge. As a succulent, it stores water in its leaves and stems and is highly susceptible to overwatering. Allow the soil to dry out completely between waterings.
The Medicinal Marvel: Aloe vera
- Description: Aloe vera is one of the most famous and recognizable succulents in the world. It grows in a stemless rosette pattern, producing long, thick, fleshy leaves that are typically green with serrated edges and sometimes white spots.
- Uses: For centuries, the clear gel inside the leaves of the Aloe vera plant has been used for its soothing and healing properties. It is commonly applied topically to relieve the pain and inflammation of minor cuts, burns, and especially sunburns.
- Important Warning: While the gel is safe for topical use, it should never be ingested by people or pets. Consuming aloe can cause digestive upset and may be toxic in larger quantities.
- Care: Aloe vera prefers bright, indirect sunlight. Too much direct sun can turn its leaves yellow or brown. Water deeply but infrequently, allowing the top two inches of soil to dry out completely before watering again.
Part 7: Designing with Succulents: Ideas for Your Home and Garden
Succulents are not just plants; they are living sculptures. Their incredible diversity in form, color, and texture makes them versatile design elements that can enhance any space, from a modern minimalist apartment to a rustic country garden. Here are a few ideas to inspire your creativity.
Creating Stunning Container Arrangements
Container gardening is one of the best ways to showcase the beauty of succulents, allowing you to create dynamic, low-maintenance compositions.
- The “Thriller, Filler, Spiller” Principle: A classic design rule that works perfectly for succulents. Choose a tall, dramatic “thriller” plant (like an Agave or a columnar cactus) as your focal point. Add mounding or rosette-shaped “filler” plants (like Echeveria or Sedum) around it. Finish the arrangement with a “spiller” plant (like Sedum morganianum or ‘String of Pearls’) that will cascade over the edge of the pot.
- Mindful Pairings: The most important rule for a successful and long-lasting arrangement is to choose plants that have similar light and water requirements. A sun-loving desert cactus will not thrive in the same pot as a shade-tolerant Haworthia.
Building a Low-Maintenance Rock Garden
Rock gardens provide the perfect naturalistic setting for succulents, as they mimic the gritty, well-draining conditions of their native habitats.
- Naturalistic Design: Use a variety of rock sizes to create crevices and pockets for planting. Incorporate gravel or pebbles as a top dressing, which not only looks great but also helps with drainage, keeps the leaves off damp soil, and reflects heat.
- Plant Selection: Choose hardy succulents with contrasting shapes and colors to create visual interest against the rugged texture of the stones. Low-growing groundcovers like Sedum and mat-forming Sempervivum (“Hens and Chicks”) are excellent choices for filling in gaps.
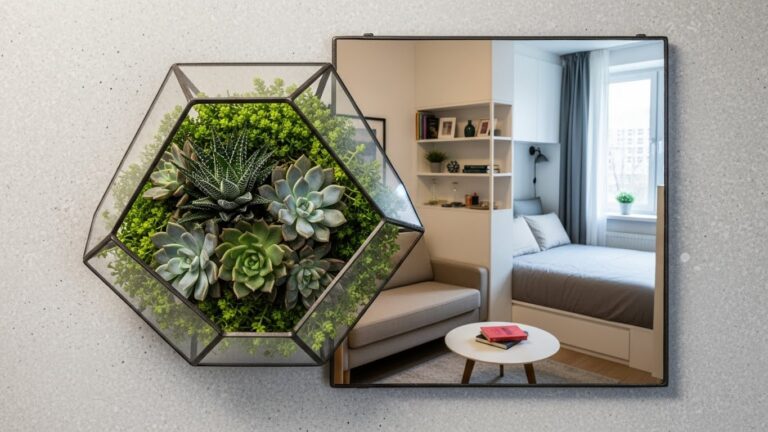
The Art of the Indoor Terrarium
Terrariums allow you to create a miniature, self-contained world, and they are a beautiful way to display small succulents on a desk or shelf.
- Choose an Open Container: This is the most critical rule for succulent terrariums. Closed terrariums trap humidity, which is fatal for succulents. Always use an open glass container, like a bowl or vase, that allows for plenty of air circulation to prevent the high humidity that leads to rot.
- Layer for Drainage: Start with a layer of gravel or small rocks at the bottom, followed by a thin layer of activated charcoal to keep the soil fresh. Then, add a deep layer of well-draining succulent soil mix before planting your chosen succulents.
- Other Creative Ideas: Do not limit your imagination. Succulents can be used to create living wreaths, unique centerpieces inside pumpkins or logs for seasonal decor, or elegant arrangements in teacups and vintage containers.
Conclusion: Your Journey to Becoming a Succulent Expert
The path to becoming a confident and successful succulent cultivator is paved with understanding, not just instruction. As this guide has shown, the key to thriving plants lies not in a rigid schedule but in a holistic appreciation for their nature. These are plants born of harsh environments, equipped with a brilliant and deeply integrated system for survival.
By embracing the five pillars of care—providing the right light, mastering the “soak and dry” watering method, using gritty soil, maintaining a stable temperature, and fertilizing with a light hand—you are doing more than following rules. You are recreating the fundamental conditions that allow these remarkable plants to flourish. When you prune, you are strategically redirecting their energy. When you propagate, you are participating in their ancient and resilient life cycle.
The journey of caring for succulents is one of observation, patience, and gentle intervention. The knowledge you have gained here is your foundation. Use it to experiment, to create beautiful arrangements, and to enjoy the quiet satisfaction that comes from nurturing these symbols of endurance and beauty in your own home. Welcome to the world of succulents; your adventure is just beginning.