The Enduring Allure of the Airplane Plant
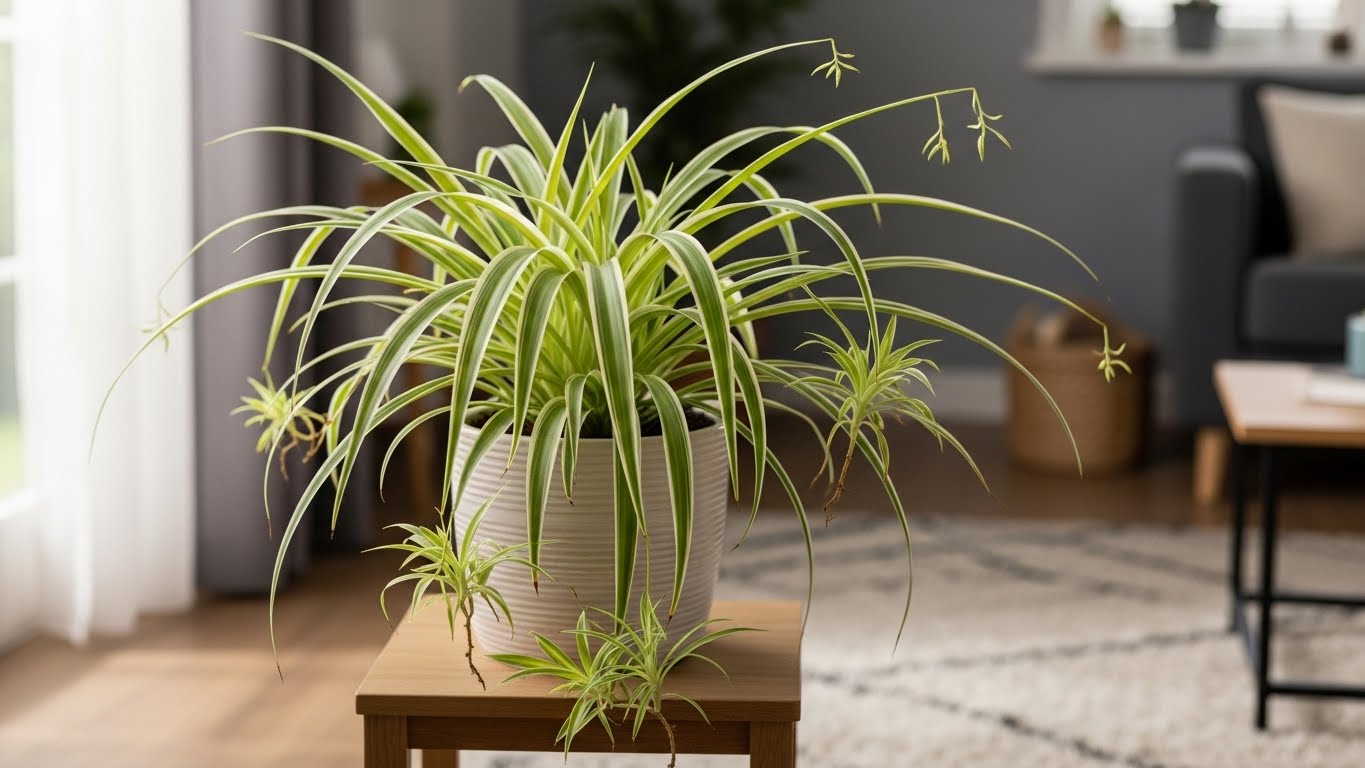
The Spider Plant, known botanically as Chlorophytum comosum, is more than a mere houseplant; it is a timeless icon of interior horticulture, a living sculpture that has graced homes for generations. Its enduring appeal lies in a rare combination of graceful aesthetics and profound resilience. With arching, fountain-like foliage, it effortlessly introduces a touch of vibrant life to any space, while its forgiving nature makes it an ideal companion for both novice gardeners and seasoned connoisseurs. Its many evocative common names—including Spider Ivy, Ribbon Plant, Airplane Plant, and Hen and Chickens—are a testament to its widespread cultural adoption and the charming, spider-like plantlets that dangle from its long stems.
This plant’s journey from its native habitat in the tropical and southern regions of Africa to its current status as a global household staple is a story of remarkable adaptability. First formally described by the Swedish naturalist Carl Peter Thunberg in 1794, its inherent hardiness allowed it to thrive far from the forest margins it originally called home. This resilience is not the sole reason for its sustained popularity. The spider plant’s success is a perfect synergy of form and function that aligns with contemporary lifestyle priorities. It is a key element in biophilic design, which seeks to connect human interiors with nature. Furthermore, its proven ability to contribute to cleaner indoor air and, most critically, its non-toxic status for children and pets, make it a holistic choice for the modern, conscientious home. It is a plant that succeeds by being effortlessly beautiful, beneficial, and, above all, safe.
This guide serves as a definitive, comprehensive resource for the care and appreciation of Chlorophytum comosum. It moves beyond basic tips to provide a deep, holistic understanding of the plant’s needs, behaviors, and benefits. Central to this exploration is its well-documented, kid- and pet-friendly nature, a cornerstone of its appeal and a primary focus for any responsible home curator.
A Field Guide to Spider Plant Varieties
While many recognize the quintessential spider plant, the species Chlorophytum comosum boasts a delightful diversity of cultivars. Understanding these variations is not merely an aesthetic exercise; it informs care strategies and sets realistic expectations for the plant’s growth and appearance. The choice of cultivar can influence everything from its ultimate size to its propensity for producing the charming “spiderettes” that give the plant its name.
Understanding the Classics
- C. comosum ‘Vittatum’: Often considered the archetypal spider plant, ‘Vittatum’ is characterized by its gracefully recurved, medium-green leaves featuring a broad, creamy-white stripe down the center. This variety is a vigorous grower and a prolific producer of plantlets, which dangle from distinctive long, white stems, making it a spectacular choice for hanging baskets.
- C. comosum ‘Variegatum’: Known as the “reverse” spider plant, ‘Variegatum’ presents a striking contrast to its classic cousin. Its leaves are a darker, richer green, elegantly defined by crisp white margins. Generally smaller and more compact than ‘Vittatum’, its plantlets are borne on green stems. This cultivar’s more contained growth habit can make it an excellent choice for locations where space is a consideration.
- C. comosum ‘Bonnie’: This charming and popular cultivar is distinguished by its compact form and delightfully twisted, curling leaves. The foliage displays the classic green-and-cream variegation but in a whimsical, spiraling form, making ‘Bonnie’ an ideal specimen for smaller pots on desks or shelves where its unique texture can be appreciated up close.
- C. comosum ‘Hawaiian’: This unique and captivating variety offers a dynamic display of color. New leaves emerge with a bright, vibrant variegation that gradually fades to a more uniform green as the leaf matures. This is an inherent characteristic, not a sign of poor health. The result is a subtle and beautiful contrast between the bright new growth at the plant’s center and the darker, mature outer leaves. The plantlets it produces will again display the initial bright variegation, continuing the cycle.
Beyond the Common Cultivars
To fully appreciate the breadth of the species, it is worth noting other, less common varieties. Cultivars like ‘Picturatum’, which has a central yellow stripe, and ‘Milky Way’, with an exceptionally broad white center, showcase further variations on the classic striped theme. Recognizing this diversity allows for a more curated approach to selecting a spider plant that perfectly complements one’s personal aesthetic and interior design.
The Five Pillars of Spider Plant Care: A Masterclass
Successful spider plant cultivation rests on a holistic understanding of five interconnected pillars: light, water, soil, environment, and nutrition. While famously forgiving, mastering these elements will elevate a merely surviving plant into a thriving specimen. An imbalance in one area often manifests as a symptom that can be mistaken for a problem in another, making a comprehensive diagnostic approach essential.
Care Element | Ideal Conditions & Key Considerations |
Light | Bright, indirect sunlight is optimal (approximately 50–500 foot-candles). An east-facing window is ideal. Avoid prolonged direct sun, which can scorch leaves. |
Water | Water thoroughly when the top 1–2 inches of soil are dry. Use filtered, distilled, or rainwater to avoid chemical sensitivity. Ensure excellent drainage. |
Soil | A well-draining, aerated potting mix is crucial. The ideal pH range is neutral to slightly acidic, from 6.0 to 7.5. |
Temperature | Prefers a stable range of 60–85°F (15–29°C). Protect from temperatures below 50°F (10°C) and avoid drafts from vents or windows. |
Humidity | Thrives in 40–60% humidity but tolerates average household levels. Low humidity is a primary cause of brown leaf tips. |
Fertilizer | Feed sparingly. Use a balanced, water-soluble fertilizer diluted to half-strength once a month only during the spring and summer growing seasons. |
Light: Illuminating the Path to Health
The quality of light is the primary driver of a spider plant’s growth and vibrancy. The ideal condition is bright, indirect light. This can be practically achieved by placing the plant near an east-facing window that receives gentle morning sun, or several feet back from a more intense south- or west-facing window, where a sheer curtain can diffuse the harshest rays.
The plant communicates its lighting needs clearly. An excess of direct sunlight will cause the leaves to scorch, fade, and develop brown, crispy tips. Conversely, insufficient light leads to a cascade of negative symptoms. Growth will slow dramatically, and the characteristic variegation of cultivars like ‘Vittatum’ and ‘Variegatum’ may fade as the leaves revert to a solid green in an effort to maximize chlorophyll production. The foliage may become limp and droopy, and the plant will cease to produce the runners and spiderettes, conserving its limited energy for basic survival. One of the spider plant’s greatest assets is its tolerance for lower light conditions and even artificial fluorescent lighting, making it an exceptional choice for offices and other interior spaces with limited natural light.
Water: The Art and Science of Hydration
Proper watering is perhaps the most nuanced aspect of spider plant care, as both over- and under-watering can lead to similar symptoms. The key principle is to water based on soil moisture, not a rigid schedule. Allow the top 1 to 2 inches of the soil to become dry to the touch before watering thoroughly, allowing excess water to escape through the drainage holes. This practice is crucial because Chlorophytum comosum possesses thick, fleshy tuberous roots designed to store water, which grants it a degree of drought tolerance. However, this same adaptation makes it highly susceptible to root rot if left in consistently soggy, waterlogged soil.
Of critical importance is the quality of the water itself. Spider plants are notoriously sensitive to chemicals commonly found in municipal tap water, particularly fluoride and chlorine, as well as an accumulation of mineral salts. This chemical sensitivity is one of the most frequent culprits behind the dreaded brown leaf tips. To prevent this, it is highly recommended to use rainwater, distilled water, or filtered water. If using tap water is unavoidable, allowing it to sit in an open container for 24 hours can help some of the chlorine dissipate, though this will not remove fluoride or dissolved salts. A combination of watering techniques can be beneficial. Top-watering is effective for flushing out accumulated salts from the soil, while bottom-watering—placing the pot in a saucer of water and allowing it to absorb moisture from the bottom up—is an excellent way to rehydrate soil that has become overly dry.
Soil: Crafting the Perfect Foundation
The foundation for a healthy spider plant is a soil medium that provides a perfect balance of moisture retention and excellent drainage. A dense, heavy soil that stays wet for long periods is a primary cause of root rot. The ideal potting mix is light, loose, and well-aerated. This can be achieved with a high-quality commercial potting mix amended with materials that improve drainage and aeration, such as perlite, pumice, or coarse sand. Adding organic components like peat moss, coco coir, or orchid bark provides structure and helps retain just enough moisture without becoming waterlogged. It is even possible that perlite itself can be a source of fluoride, further underscoring the plant’s sensitivity and the benefit of using alternative aerators like pumice or rice hulls. A simple and effective do-it-yourself recipe consists of two parts standard potting mix, one part perlite or pumice, and one part orchid bark.
The choice of container is equally important. A pot with ample drainage holes is non-negotiable. Materials like unglazed terracotta or ceramic are porous and allow for faster evaporation, which can help prevent the soil from staying too wet, especially for those prone to overwatering. Spider plants are fast growers, and their robust tuberous roots can quickly fill a container, sometimes to the point of cracking a plastic pot. Repotting is typically necessary every one to two years and is best done in the spring. When repotting, select a new container that is only slightly larger—about 1-2 inches wider in diameter—than the current one, as a pot that is too large can hold excess moisture and increase the risk of root rot.
Temperature & Humidity: Recreating a Gentle Climate
Chlorophytum comosum thrives in the same temperature range that is comfortable for humans, making it perfectly suited for indoor life. An ideal temperature range is between 60°F and 85°F (15°C to 29°C). The plant is not frost-tolerant and should be protected from temperatures that drop below 50°F (10°C). It is also sensitive to sudden temperature fluctuations and should be placed away from cold drafts from windows or doors, as well as direct blasts of hot or cold air from heating and air-conditioning vents.
While the spider plant can tolerate the dry air typical of many homes, its origins in the humid subtropics of Africa mean it truly flourishes with higher humidity levels, ideally between 40% and 60%. In fact, low ambient humidity is a very common cause of brown, crispy leaf tips. Fortunately, increasing the humidity around the plant is simple. Regular misting with a fine spray of water can provide a temporary boost. For a more sustained effect, one can group the spider plant with other houseplants to create a humid microclimate through collective transpiration. Another effective method is to place the pot on a tray filled with pebbles and a small amount of water; as the water evaporates, it raises the humidity in the immediate vicinity of the plant. Placing the plant in a naturally more humid room, such as a bathroom or kitchen, can also provide the ideal environment for it to thrive.
Fertilization: A Balanced Diet for Vibrant Growth
One of the most common mistakes in spider plant care is over-fertilization. These plants are not heavy feeders, and an excess of nutrients, particularly the salts found in synthetic fertilizers, can accumulate in the soil and cause chemical burn, which manifests as brown leaf tips. Furthermore, a heavily fertilized plant may be stimulated to produce lush foliage at the expense of forming the desirable plantlets.
A “less is more” approach is best. During the active growing seasons of spring and summer, feed the plant once a month with a balanced, all-purpose, water-soluble fertilizer that has been diluted to half the strength recommended on the packaging. During the fall and winter, when the plant’s growth naturally slows, fertilization should be suspended entirely. To prevent the gradual buildup of fertilizer salts in the soil, it is a good practice to periodically flush the pot. This is done by slowly pouring a generous amount of clean, non-chlorinated water through the soil, allowing it to drain completely. This process leaches out excess salts and helps maintain a healthy root environment.
Troubleshooting: A Diagnostic Guide for the Concerned Plant Parent
Even the most resilient plants can show signs of stress. For the spider plant, most common issues are not signs of disease but rather the plant’s way of communicating an imbalance in its environment. Understanding these signals requires a holistic diagnostic approach, recognizing that a single symptom can stem from multiple, often interconnected, causes. The key is to move beyond treating the symptom and instead address the root cause by auditing the five pillars of care.
The Mystery of the Brown Tips: An Exhaustive Analysis
Brown, crispy leaf tips are the most frequent complaint among spider plant owners. This issue is rarely fatal but detracts from the plant’s graceful appearance. It is a classic symptom of environmental stress, and identifying the specific stressor is crucial.
- Cause 1: Chemical Sensitivity: This is the most common culprit. The fluoride and chlorine in untreated tap water are toxic to spider plants and accumulate in the leaf tips over time, causing the tissue to die and turn brown.
- Cause 2: Low Humidity: In dry air, moisture evaporates from the leaves faster than the roots can absorb it. The leaf tips, being the furthest point from the roots, are the first to dehydrate and turn brown.
- Cause 3: Inconsistent Watering: Both extremes are damaging. Underwatering causes the entire plant to dehydrate, leading to crispy tips. Overwatering leads to root rot; damaged roots cannot effectively absorb water, ironically producing the same symptom of dehydration in the leaves.
- Cause 4: Mineral & Salt Buildup: An excess of fertilizer salts or minerals from hard water accumulates in the soil, burning the sensitive roots and leading to brown tips.
- Cause 5: Sunburn: Placing the plant in direct, intense sunlight will scorch the delicate leaf tissue, causing it to turn brown.
The Remedial Plan: A systematic approach is required. First, immediately switch to using distilled water, rainwater, or filtered water. Second, increase ambient humidity using a pebble tray, misting, or a humidifier. Third, assess the soil moisture and adjust the watering schedule accordingly, allowing the top inch to dry out. Fourth, if over-fertilization is suspected, flush the soil thoroughly with clean water to remove excess salts. Finally, if the plant is in a location with direct sun, move it to a spot with bright, indirect light. It is important to note that while the brown tips can be trimmed off with clean scissors for aesthetic reasons, the damaged tissue will not turn green again.
Why Won’t My Spider Plant Make Babies?: Unlocking Propagation
A healthy, mature spider plant that fails to produce its signature “spiderettes” can be a source of frustration. This behavior is typically a response to specific environmental cues, and encouraging propagation involves understanding the plant’s biological triggers. This requires a nuanced understanding of plant stress: while “bad stress” from poor care causes decline, a specific type of “good stress” can trigger a positive reproductive response.
- Factor 1: Maturity: First and foremost, the plant must be old enough to reproduce. A young plantlet that has recently been potted will focus its energy on establishing a strong root system and foliage. It can take a year or more for a plant to reach maturity and begin producing runners.
- Factor 2: Insufficient Light: Light is energy. In low-light conditions, a spider plant will enter survival mode, using all available energy for basic photosynthesis. It will not expend the extra energy required to produce flowers and plantlets.
- Factor 3: The “Root-Bound” Trigger: This is a critical and counter-intuitive factor. A spider plant that has ample room in its pot will focus on filling that space with roots and leaves. However, when the plant becomes slightly root-bound, its thick tuberous roots fill the pot, signaling that it has reached the limits of its current environment. This mild, “good” stress acts as a biological trigger, prompting the plant to shift its energy toward reproduction by sending out runners to find new territory.
- Factor 4: Over-Fertilization: As with foliage health, too much fertilizer can inhibit the production of babies. The plant will channel the excess nutrients into vegetative growth (more leaves) rather than reproductive growth (runners and plantlets).
The Strategy: To encourage a mature plant to produce spiderettes, first ensure all “bad stress” is eliminated by providing optimal care. Then, introduce the “good stress” trigger. Provide consistent, bright, indirect light. Allow the plant to become comfortably pot-bound. And, crucially, be sparing with fertilizer during the growing season.
Common Pests & Organic, Pet-Safe Solutions
While generally robust, spider plants can occasionally fall prey to common houseplant pests. Early detection and treatment with safe, organic methods are key to protecting both the plant and the home environment.
- Identification:
- Spider Mites: These tiny arachnids are difficult to see with the naked eye. The first signs are often fine, silky webbing on the undersides of leaves and in the plant’s crown, along with a stippled or speckled appearance on the leaves where they have pierced the cells to feed.
- Aphids, Mealybugs, and Scale: These sap-sucking insects are more visible. Aphids are small, pear-shaped insects that cluster on new growth. Mealybugs appear as white, cottony masses in leaf axils and along stems. Scale insects look like small, brown, immobile bumps on leaves and stems.
- Kid- & Pet-Safe Treatments:
- Mechanical Removal: The first line of defense is physical. A strong jet of water from a showerhead or sink sprayer can effectively dislodge many pests, especially spider mites and aphids. For mealybugs and scale, wiping the leaves with a soft cloth or cotton swab dipped in rubbing alcohol can be effective.
- Insecticidal Soap: Commercially available insecticidal soaps are a safe and effective option. They work by disrupting the outer cell membranes of soft-bodied insects. It is crucial that the spray makes direct contact with the pests to be effective, so thorough coverage of all plant surfaces, especially the undersides of leaves, is necessary. Repeat applications may be required.
- Neem Oil: Neem oil is a natural pesticide and fungicide derived from the seeds of the neem tree. It works as a repellent and disrupts the hormonal systems of pests, inhibiting their ability to feed and reproduce. A solution of neem oil mixed with water and a drop of mild dish soap (as an emulsifier) can be sprayed on the plant. It is best applied in the evening to avoid the risk of leaf burn in bright light.
- Preventative Care: Pests like spider mites thrive in hot, dry conditions. Maintaining adequate humidity is not only good for the plant’s health but also creates an environment that is less hospitable to these pests.
Decoding Discoloration and Drooping
- Yellow Leaves: This is most often a sign of overwatering, which leads to oxygen deprivation at the roots and the onset of root rot. However, it can also be a symptom of a severe nutrient deficiency or, if confined to the oldest, outermost leaves, simply the natural process of senescence as the plant sheds old foliage.
- Pale or Faded Leaves: A loss of vibrant color, especially in variegated cultivars, is typically a sign of insufficient light. In some cases, very intense, direct sun can also cause the color to appear bleached or faded.
- Limp or Droopy Leaves: Wilting foliage can be caused by both overwatering and underwatering. The only way to diagnose the correct cause is to feel the soil. If the soil is bone dry, the plant is dehydrated and needs water. If the soil is soggy, the roots are likely suffocating or rotting, and the plant should be allowed to dry out completely before watering again.
The Art of Propagation: Multiplying Your Collection
One of the greatest joys of owning a spider plant is its remarkable ease of propagation. The plant actively seeks to reproduce by sending out runners that bear miniature plantlets, or “spiderettes,” making it incredibly simple to create new plants to expand a collection or share with others. The choice of propagation method can be tailored to one’s personal preference and experience level, from visually engaging projects perfect for children to more direct and efficient techniques.
Propagating from “Spiderettes” (Plantlets)
There are three primary methods for turning spiderettes into independent plants. Each has a high rate of success.
- Method 1: Rooting in Water: This is a visually rewarding method that allows one to watch the roots develop. It is an excellent project for families and beginners.
- Select a healthy spiderette that has begun to form small, nub-like aerial roots at its base.
- Using a clean, sterilized pair of scissors, snip the plantlet from the long runner.
- Place the base of the spiderette in a clear glass or jar filled with room-temperature, non-chlorinated water. The leaves should rest on the rim, keeping them dry, while the base is submerged.
- Position the jar in a location with bright, indirect light and change the water every few days to keep it fresh.
- Once the roots have grown to be 1-2 inches long, the new plant is ready to be transplanted into a small pot with soil.
- Method 2: Rooting Directly in Soil: This is the most straightforward and efficient method, as it skips the water-to-soil transition.
- Prepare a small pot with a well-draining potting mix.
- Select and snip a spiderette from its runner, preferably one that already has small aerial roots to help anchor it.
- Make a small indentation in the soil and plant the base of the spiderette. Gently firm the soil around it.
- Water the soil lightly to keep it moist but not soggy as the new roots establish themselves.
- Method 3: Layering (The “Umbilical Cord” Method): This is the most foolproof technique, ideal for those who are risk-averse. It allows the plantlet to establish its own root system while still receiving nutrients from the parent plant.
- Place a small pot filled with soil next to the mother plant.
- Without detaching it, drape a runner over the new pot so that a spiderette rests on the surface of the soil.
- Secure the runner in place with a floral pin or a small stone to ensure the base of the spiderette maintains contact with the soil.
- Keep the soil in the small pot consistently moist.
- After a few weeks, the spiderette will have developed its own root system. A gentle tug that meets with resistance will confirm it is rooted. At this point, the runner can be snipped, separating the new, independent plant from its parent.
Propagation by Division
For a large, overgrown, or pot-bound spider plant, propagation by division is an excellent way to manage its size while creating multiple new, mature plants. This method is best performed in the spring when repotting.
- Carefully remove the entire plant from its container.
- Gently tease apart the dense, tuberous root ball with your hands. If necessary, use a clean, sharp knife to cut the root mass into two or more sections.
- Ensure that each new division has a healthy portion of both roots and foliage.
- Pot each division into an appropriately sized new container with fresh, well-draining soil and water thoroughly.
Beyond the Pot: Benefits, Safety, and Styling
The value of a spider plant extends far beyond its decorative appeal. It contributes to a healthier home environment, offers peace of mind with its non-toxic nature, and provides versatile styling options that can enhance any interior design scheme.
A Breath of Fresh Air: The Truth About Air Purification
The spider plant’s reputation as an air purifier is well-known, stemming largely from the influential 1989 NASA Clean Air Study. This research demonstrated the plant’s ability to remove common indoor air pollutants such as formaldehyde, xylene, and carbon monoxide from a sealed environment. The process, known as phytoremediation, involves the plant absorbing these volatile organic compounds (VOCs) through its leaves. The pollutants are then transported to the root zone, where beneficial microbes in the soil break them down into harmless substances.
It is important, however, to manage expectations. The NASA study was conducted in a small, sealed Plexiglas chamber—a highly controlled environment that does not replicate the air circulation of a typical home. To achieve a significant, measurable reduction in VOCs throughout an entire house, an impractically large number of plants would be required. While not a replacement for proper ventilation or a mechanical air purifier, a spider plant can certainly contribute positively to the air quality in its immediate vicinity, or what is known as the “personal breathing zone”. It is best viewed as one component of a holistic approach to creating a healthy indoor ecosystem.
A Safe Haven for Pets and Kids
The most significant and unequivocal health benefit of the spider plant is its safety profile. For households with curious children and pets, this is a paramount consideration. Chlorophytum comosum is officially listed as non-toxic to cats, dogs, and horses by the American Society for the Prevention of Cruelty to Animals (ASPCA). This provides invaluable peace of mind, allowing the plant to be enjoyed without the worry of accidental poisoning. For more information on safe houseplants, see our guides on /lifestyle/kids/kid-safe-indoor-plants/ and /types/pet-friendly/.
Interestingly, cats often show a particular fascination with spider plants. This attraction is twofold. First, the long, dangling spiderettes are visually stimulating and can be irresistible for a playful cat, resembling a dangling toy. Second, there is anecdotal evidence to suggest that the plant’s foliage contains chemical compounds, distantly related to opium, that can produce a mild, harmless euphoric or hallucinogenic effect in felines, similar to catnip. While this is intriguing, it is also wise to exercise a degree of caution. Even though the plant is non-toxic, the ingestion of a large quantity of any plant matter can lead to mild gastrointestinal upset, such as vomiting or diarrhea, in pets. For this reason, if a pet is an obsessive chewer, it is still a good practice to place the spider plant in a hanging basket or on a high shelf, out of easy reach—a measure that protects both the pet from discomfort and the plant from damage.
Styling with Spider Plants: Integrating Greenery into Your Decor
The natural form of the spider plant lends itself to a wide array of decorative applications. Its cascading habit is its greatest visual asset and should be showcased.
- Harnessing the Cascade: The most effective way to display a mature spider plant is to elevate it. Hanging baskets, macramé plant hangers, or placement on a high shelf, pedestal, or mantle allows its runners and spiderettes to drape down, creating a dynamic, living mobile.
- Creative Containers: While the plant is classic, its container need not be. Pairing a spider plant with a modern ceramic planter, a rustic terracotta pot, or even a repurposed vintage item like a teacup or mason jar can create a personalized and stylish statement.
- Lush Groupings: Create a vibrant indoor garden by grouping a spider plant with other houseplants that share similar light and water requirements, such as pothos, philodendrons, or snake plants. The contrasting textures and forms create a rich, layered, and visually appealing display.
- Versatile Applications: The spider plant’s utility is not confined to a simple pot. It can be a charming addition to a glass terrarium, serve as the “spiller” element in a mixed outdoor container for a shady patio (in USDA zones 9-11), or even be used as a grassy groundcover in a shaded garden bed in warmer climates.


