Part 1: An Introduction to the Emblem of Peace
The Enduring Allure of Spathiphyllum
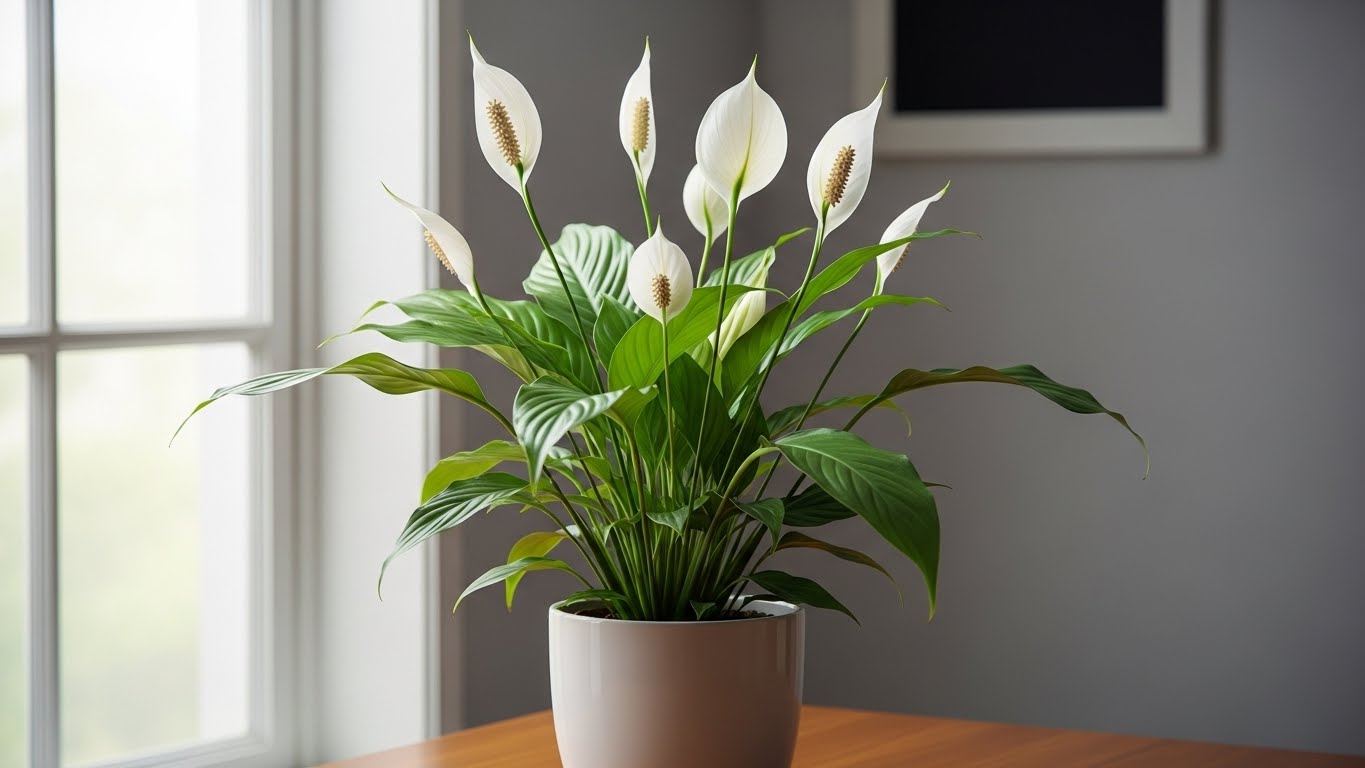
The Peace Lily, known botanically as Spathiphyllum, stands as one of the most beloved and recognizable houseplants in the world. Its popularity is not a fleeting trend but a testament to a unique combination of aesthetic grace, profound symbolism, and a famously forgiving nature. With its deep, glossy green leaves that emerge directly from the soil and its elegant white blooms held aloft on slender stalks, the Peace Lily brings a touch of tropical sophistication to any indoor space.
This visual appeal is deeply interwoven with its rich symbolic meaning. The plant’s common name is derived from its distinctive white flower—a modified leaf called a spathe—which resembles a white flag of truce, a universally recognized symbol of peace. This association has made the Peace Lily a thoughtful and common gift for a wide range of human experiences. It is often given to express sympathy and solace during times of loss, to celebrate new beginnings like the birth of a child, or as a literal peace offering to mend relationships. In the practice of Feng Shui, the Peace Lily is revered as a symbol of peace and harmony, believed to purify negative energy and promote a sense of balance and tranquility within a home or office.
Beyond its beauty and meaning, the Peace Lily’s reputation as a low-maintenance and resilient plant has cemented its status as a gateway for novice gardeners. It is famously “forgiving” of occasional neglect and communicates its needs with a dramatic flair—the telltale drooping of its leaves is a clear and unmistakable call for water. This combination of aesthetic elegance, symbolic depth, and user-friendly care creates a powerful and self-reinforcing cycle of popularity. It is seen in countless homes, recommended by seasoned gardeners, and gifted with heartfelt intention, ensuring its place as a quintessential and cherished houseplant.
Deconstructing the Peace Lily: A Botanical Deep-Dive
To truly master Peace Lily care, one must first understand the plant itself and the world from which it came. Spathiphyllum is a genus comprising approximately 60 species of evergreen, herbaceous perennials belonging to the Araceae family, commonly known as the arum family. It is crucial to note that despite its name, the Peace Lily is not a true lily from the Lilium genus—a distinction that is vital for pet owners to understand, as will be discussed in the toxicity section.
The genus is native to the tropical rainforests of Central and South America, with some species found in parts of Southeast Asia. In their natural habitat, they are understory plants, thriving on the forest floor beneath a dense canopy. They often grow in colonies along streams, in river valleys, and in wet, shady areas that may be periodically inundated with water. This native environment is the single most important key to unlocking successful indoor cultivation. Every aspect of proper care—from lighting to watering to soil composition—is a direct attempt to replicate the conditions to which the Peace Lily has adapted over millennia. The dappled sunlight filtering through the canopy informs its light requirements; the constant moisture and high humidity of the rainforest dictate its need for a humid environment; and the rich, loose, and well-aerated forest floor, composed of decomposing organic matter, provides the blueprint for its ideal potting mix.
Anatomically, the Peace Lily is acaulescent, meaning it has no visible above-ground stem. Its large, ovate to lance-shaped leaves, which can range from 4 to 25 inches in length, emerge directly from a short, underground creeping stem known as a rhizome. The iconic white “flower” is, botanically speaking, an inflorescence. It consists of two main parts: the large, petal-like modified leaf, called a spathe, and the central, spike-like structure called the spadix. The spadix is where the plant’s true flowers are located—tiny, numerous, and containing both male and female reproductive parts. The spathe typically begins as a pale green or white bud, unfurls to its signature bright white, and as it ages over several weeks, it often fades back to a light green before eventually turning brown. Understanding this structure helps demystify the plant’s life cycle and informs proper pruning practices.
Table 1: A Guide to Popular Peace Lily Cultivars
The term “Peace Lily” encompasses a wide variety of plants, from compact tabletop specimens to towering floor plants. Choosing the right cultivar for a specific space and understanding its unique characteristics can significantly impact its success and the owner’s satisfaction. Variegated types, for example, require more light to maintain their distinctive patterns, while giant varieties are better suited for large, open areas.
Cultivar Name | Mature Size (Indoors) | Distinguishing Features | Key Care Considerations |
Spathiphyllum wallisii | Up to 12-15 inches | The classic, smaller Peace Lily. Dark green, glossy leaves. The genetic parent of many hybrids. | Standard care. An excellent choice for smaller spaces. |
‘Sensation’ | 4 to 6 feet | The largest of the common cultivars. Huge, deeply ribbed, dark green leaves. | A statement floor plant. Can tolerate deeper shade better than smaller varieties. |
‘Domino’ | 1 to 3 feet | Deep green leaves heavily variegated with white to cream-colored splashes and stripes. | Needs consistent, bright indirect light to maintain its striking variegation. |
‘Picasso’ | 1 to 2 feet | Known for its dramatic, sectoral variegation with large blocks of pure white on the leaves. | Highly sought after. Requires bright, indirect light. Variegation can be unstable. |
‘Power Petite’ | Up to 12 inches | A very compact, dwarf variety with lush foliage and a tidy growth habit. | Ideal for desktops and small shelves. Standard care. |
‘Mauna Loa Supreme’ | 2 to 4 feet | A mid-sized, robust variety known for its broad, glossy leaves and large white flowers. | A popular and reliable choice for a medium-sized floor plant. |
‘Jetty’ | 1 to 2 feet | Features glossy, deep green leaves and produces elegant white spathes that are long-lasting. | A newer cultivar known for its strong blooming performance. |
Part 2: The Pillars of Peace Lily Care: Mastering the Environment
The Science of Light: Beyond ‘Bright, Indirect’
The most common advice for Peace Lily lighting is to provide “bright, indirect light,” a phrase that is both accurate and frustratingly vague. To truly optimize the plant’s health and encourage blooming, it is necessary to understand light as a spectrum of outcomes. The widespread marketing of the Peace Lily as a “low-light” plant is a simplification that often leads to the most common complaint from owners: a healthy plant that simply refuses to flower. While the plant can indeed survive in low light, survival is not the same as thriving. Photosynthesis is the process of converting light into energy, and the high-energy act of producing flowers requires a much greater fuel supply than simply maintaining foliage.
For a more precise understanding, light intensity can be measured in foot-candles (FC). A practical framework for Peace Lily lighting can be broken down into three tiers:
- Low Light (Survival Mode: 50–100 FC): This is the light level found in a dim corner far from a window or in a room with only a north-facing window. In these conditions, a Peace Lily will survive. Its foliage will remain green, but growth will be slow to nonexistent, and it will not produce flowers. Furthermore, a plant in this state is at a much higher risk of root rot, as it is not actively using water and the soil stays wet for prolonged periods.
- Medium Light (Thriving Mode: 100–250 FC): This is the ideal range for lush, healthy foliage and represents the minimum light required for a chance at blooming. This level of light is typically found near a north- or east-facing window or several feet back from a brighter south- or west-facing window. The plant will exhibit robust growth and a full, healthy appearance.
- Bright, Indirect Light (Blooming Mode: 250+ FC): To consistently produce its signature white spathes, a mature Peace Lily needs to receive this higher level of filtered light for at least six to eight hours a day. This can be achieved by placing it in a prime spot near an east-facing window, which receives gentle morning sun, or near a south- or west-facing window that is protected by a sheer curtain to diffuse the harsh afternoon rays. Direct, unfiltered sunlight must be avoided, as it will scorch the plant’s thin leaves, causing brown patches and curled, pale foliage.
The Art of Watering: Decoding the Droop and Avoiding Root Rot
The Peace Lily presents a fascinating paradox: it is described by botanists as a “water hog” that often grows in or near water in its native habitat, yet overwatering is the single most common reason for its demise in a home setting. This apparent contradiction is resolved by understanding the critical difference between high water volume and high water stagnation. The goal of proper watering is to provide the abundant moisture the plant’s DNA expects while ensuring its roots are never deprived of oxygen.
In the wild, the streamside soil is constantly flushed with fresh, oxygenated water. In a pot, however, stagnant water fills the air pockets in the soil, suffocating the roots. This anaerobic environment allows fungi and bacteria to proliferate, leading to root rot, a condition from which few plants recover. Therefore, the solution is not to water sparingly but to water smartly.
The most effective technique is the “drench and drain” method. When the plant needs water, it should be irrigated thoroughly until water flows freely from the pot’s drainage holes. This action not only saturates the soil but also flushes out accumulated mineral salts and pulls fresh oxygen down into the root zone as the excess water drains away. After this thorough drenching, the pot must be allowed to drain completely. It is absolutely essential to empty any water that collects in the saucer beneath the pot; letting a Peace Lily sit in a puddle is the fastest path to root rot.
The Peace Lily provides one of the clearest signals of any houseplant when it is thirsty: its leaves will droop dramatically. This is a reliable cue. The best practice is to water when the top inch of the soil feels dry to the touch, or just as the leaves begin to show the first signs of wilting. Allowing the plant to collapse completely before watering can stress it over time, but it is far more forgiving of underwatering than overwatering.
Water quality is another important consideration. Peace Lilies can be sensitive to chemicals commonly found in municipal tap water, particularly fluoride and chlorine, which can accumulate in the soil and cause brown leaf tips. To avoid this, it is best to use filtered water, distilled water, or collected rainwater. If tap water is the only option, letting it sit out in an open container for 24-48 hours can allow some of the chlorine to dissipate.
The Foundation of Health: Crafting the Ideal Soil Mix
The perfect soil for a Peace Lily is not merely a substrate to hold it upright; it is an engineered ecosystem designed to resolve the watering paradox by providing both excellent moisture retention and superior aeration. Its composition should mimic the humus-rich, loose, and well-draining floor of its native tropical rainforest. A dense, heavy potting soil will retain too much water, leading inevitably to the root rot the plant is so susceptible to. The ideal soil pH is slightly acidic, generally between 5.5 and 6.5.
While many high-quality commercial indoor potting mixes can work, they can often be improved by adding amendments to increase aeration. For the dedicated grower, creating a custom mix provides ultimate control over the root environment. A highly effective DIY recipe explains the function of each component:
- 50% Coco Coir or Peat Moss: This is the base of the mix, acting as a sponge. It has excellent water-retention properties, holding moisture available for the roots to absorb as needed.
- 25% Perlite or Pumice: These lightweight, porous volcanic materials are crucial for aeration. They do not hold water themselves but create thousands of tiny air pockets throughout the mix. These pockets allow excess water to drain away quickly and ensure that roots have constant access to oxygen, even when the coir is damp.
- 15% Orchid Bark: The larger pieces of bark create even bigger air pockets, preventing the mix from compacting over time. As the bark slowly breaks down, it also contributes to the organic richness of the soil, mimicking the decomposing leaf litter of the forest floor.
- 5% Horticultural Charcoal: Charcoal helps to “sweeten” the soil by absorbing impurities and can help prevent the mix from developing unpleasant odors in a consistently moist environment.
- 5% Worm Castings: Peace Lily roots can be sensitive to chemical fertilizers. Worm castings provide a gentle, slow-release source of organic nutrients that will not burn the delicate roots.
This balanced system is the key to healthy roots. It allows for the deep, thorough watering the plant desires while the structure of perlite and bark ensures that excess moisture drains away, keeping the roots safe from suffocation.
Creating a Tropical Oasis: Temperature and Humidity
As a native of the tropics, the Peace Lily thrives in warmth and moisture. Replicating these conditions is a key pillar of its care. The ideal temperature range for a Peace Lily is between 65°F and 85°F (18°C to 29°C). It is sensitive to cold and should be protected from temperatures that drop below 60°F (15°C), as prolonged exposure can damage the leaves and roots. It is equally important to shield the plant from sudden temperature fluctuations and drafts, so it should not be placed near drafty windows, exterior doors, or directly in the path of heating or air conditioning vents.
Humidity is arguably more important than for many other common houseplants. Peace Lilies prefer high humidity levels, ideally 50% or higher, with an optimal range between 50% and 65%. In a typical home, especially during winter when heating systems are running, humidity levels can drop well below this, leading to stress and the classic symptom of brown, crispy leaf tips.
There are several effective methods to increase the ambient humidity around a Peace Lily:
- Use a Humidifier: This is the most effective and consistent method for maintaining ideal humidity levels in a room.
- Create a Pebble Tray: Place the plant’s pot on a tray filled with pebbles and water. The water level should be kept just below the top of the pebbles so that the pot is not sitting directly in water. As the water evaporates, it creates a localized pocket of humidity around the plant.
- Group Plants Together: Plants release moisture through a process called transpiration. Grouping several plants together creates a humid microclimate as they all transpire in proximity.
- Strategic Placement: Locating the Peace Lily in a naturally more humid area of the home, such as a bathroom (with adequate light) or kitchen, can be highly beneficial.
- Misting: While many people mist their plants, its effects are temporary, and opinions on its efficacy are mixed. If misting is employed, it should be done in the morning to allow leaves to dry during the day, as persistently wet foliage, especially in cool conditions, can encourage fungal issues.
A nuanced approach is needed during winter. While the air is drier, light levels and temperatures are also lower. In these conditions, aggressively raising humidity can create a cool, damp environment that is conducive to fungal diseases and can make a room feel colder. During the winter, it is more important to prioritize keeping the plant warm and out of drafts than to maintain very high humidity.
Part 3: Encouraging Growth and Blooms
Feeding for Flowers: A Measured Approach to Fertilization
Fertilizer provides the essential macronutrients that fuel a plant’s growth and, critically for the Peace Lily, its ability to flower. However, this is a plant with sensitive roots, and a “less is more” approach to feeding is paramount. Over-fertilization is a common mistake that leads to a buildup of mineral salts in the soil. These salts can draw water out of the plant’s roots through osmosis, causing chemical “burn” that manifests as brown leaf tips and damaged roots.
The key to successful fertilization lies in the right formula, the right timing, and the right concentration.
- What to Use: A balanced, water-soluble liquid fertilizer is ideal. “Balanced” refers to the N-P-K ratio, which represents the percentages of Nitrogen (N), Phosphorus (P), and Potassium (K). A formula like 20-20-20 or 10-10-10 provides equal parts of these crucial nutrients. Nitrogen supports lush, green foliage; phosphorus is essential for root development and flowering; and potassium aids in overall plant health and cellular function.
- When to Feed: Fertilize only during the active growing season, which typically runs from spring through summer. During the autumn and winter, when light levels are lower and growth slows significantly, the plant does not require supplemental nutrients. Feeding a dormant plant can lead to a rapid buildup of unused salts in the soil.
- How to Feed: This is the most critical step. Peace Lilies must be fed with a diluted solution. The standard recommendation is to mix the fertilizer at one-quarter to one-half of the strength recommended on the product’s packaging. Apply the diluted fertilizer to already moist soil to ensure even distribution and prevent root shock. A safe and effective schedule is to feed once every 6 to 8 weeks during the growing season. It is far better to miss a feeding than to apply too much. Fertilizer should be viewed as a supplement for a healthy, actively growing plant, not as a medicine for a struggling one.
Solving the Blooming Mystery: Why Your Peace Lily Won’t Flower
A lush, green, but flowerless Peace Lily is one of the most common frustrations for indoor gardeners. This issue is rarely due to a single cause but is rather a diagnostic puzzle. Before troubleshooting, it is essential to understand a key practice of the commercial horticulture industry that can set unrealistic expectations. Many Peace Lilies sold in stores, especially smaller ones, have been treated with a plant hormone called gibberellic acid. This chemical induces flowering in immature plants to make them more appealing for sale. Once the plant is in a home environment and the hormone’s effects wear off, it will not bloom again until it reaches natural maturity, which can take one to three years. If a small plant was flowering beautifully when purchased but has not bloomed since, this is the most likely reason, and the only solution is patience.
For a mature plant that is not blooming, a systematic check of its environmental conditions will almost always reveal the cause.
- Check the Light: This is the number one culprit. As detailed previously, while the plant can survive in low light, it requires consistent, bright, indirect light (250+ FC) to gather enough energy to produce flowers. Move the plant to a brighter location, such as an east-facing window, and wait for a few months to see if new blooms emerge.
- Check the Plant’s Age: If the plant is very small (in a 6-inch pot or smaller) or very old (approaching a decade), it may simply be outside its reproductive window. Young plants need time to mature, while very old plants may have passed their peak blooming years.
- Check Your Calendar: Peace Lilies have natural blooming cycles, typically flowering most prolifically in the spring and sometimes again in the autumn. A lack of flowers in the middle of winter or summer may just be a normal part of its annual rhythm.
- Check the Thermostat: Consistent warmth is a trigger for blooming. If the plant is in a chilly location or exposed to drafts with temperatures regularly dipping below 65°F (18°C), it may conserve energy and refuse to flower. An ideal daytime temperature to encourage blooming is closer to the 75°F to 85°F range (24°C to 29°C).
- Check Your Fertilizing Routine: A lack of nutrients, particularly phosphorus, can inhibit flowering. Ensure the plant is being fed with a balanced, diluted fertilizer during the growing season as described above. Conversely, using a fertilizer that is too high in nitrogen will promote lush leaf growth at the expense of flowers.
Part 4: Maintenance, Troubleshooting, and Propagation
A Picture of Health: Pruning, Cleaning, and Repotting
Routine maintenance is essential for keeping a Peace Lily looking its best and remaining healthy over the long term. These simple tasks encourage new growth, prevent disease, and ensure the plant has the resources it needs to thrive.
Pruning and Cleaning:
The large, glossy leaves of the Peace Lily are prone to collecting dust, which can block light and inhibit photosynthesis. They should be cleaned periodically by gently wiping them with a damp cloth or by giving the entire plant a lukewarm shower in a sink or bathtub. As older leaves naturally age, they will turn yellow and then brown; these should be pruned off at the base of the plant using clean, sharp scissors or pruning shears. This not only improves the plant’s appearance but also directs its energy toward new, healthy growth. Similarly, when a white spathe has finished its display and begins to fade to green or brown, the entire flower stalk should be cut off as close to the base of the plant as possible. This encourages the plant to produce new flowers.
Repotting:
Peace Lilies grow at a moderate pace and actually prefer to be slightly crowded or “root-bound” in their pots, a condition which can encourage blooming. However, after one to two years, the plant will likely have filled its pot with roots, displacing the soil and reducing its ability to hold water. Telltale signs that it’s time to repot include roots growing out of the drainage holes or circling the top of the soil, stunted growth, or the plant wilting much more frequently because there is not enough soil to retain moisture.
The best time to repot is in the spring, at the start of the growing season, which allows the plant to recover and establish itself more quickly. The process itself is straightforward:
- Choose a New Pot: Select a container that is only 1 to 2 inches larger in diameter than the current one. Moving to a pot that is too large is a common mistake; the excess soil volume will hold too much moisture, increasing the risk of root rot. Ensure the new pot has adequate drainage holes.
- Remove the Plant: Gently tip the current pot on its side and ease the plant out. If it is stuck, tap the sides of the pot or run a knife around the inner edge to loosen the root ball.
- Inspect and Prune Roots: Gently loosen the root ball and inspect the roots. Healthy roots are typically firm and white or light tan. Trim away any roots that are brown, mushy, or have a foul odor, as these are signs of rot. If the roots are tightly coiled, make a few shallow vertical cuts with a clean knife to encourage them to grow outwards into the new soil.
- Replant: Place a layer of fresh, appropriate potting mix (as described in Part 2) in the bottom of the new pot. Center the plant in the pot so that the top of the root ball sits about an inch below the rim. Fill in around the sides with more potting mix, gently tamping it down to eliminate large air pockets.
- Post-Repotting Intensive Care: Repotting is a stressful event for any plant. Proper aftercare is crucial to minimize transplant shock. Immediately after repotting, water the plant thoroughly until it drains from the bottom. For the next week or two, place the plant in a location with slightly lower light than it is used to, which reduces the demands on its recovering root system. Most importantly, do not fertilize the plant for at least one to two months after repotting. The freshly disturbed roots are highly susceptible to fertilizer burn. Some drooping after repotting is normal; with proper care, the plant should recover within a couple of weeks.
Table 2: Peace Lily Troubleshooting Guide
Plant owners often identify problems by their symptoms. This table provides a quick reference for diagnosing and addressing the most common issues encountered with Peace Lilies.
Symptom | Most Likely Causes | Solutions & Key Actions |
Peace Lily Drooping | Underwatering (most common); Severe overwatering/root rot (less common) | Check soil moisture. If top inch is dry, water thoroughly until it drains. If soil is soggy and plant is drooping, check for root rot and repot if necessary. |
Brown Leaf Tips | Low humidity; Water quality (fluoride, chlorine); Over-fertilization; Underwatering | Increase humidity with a pebble tray or humidifier. Use filtered or distilled water. Flush soil with water to remove excess fertilizer salts and pause feeding. Ensure consistent watering. |
Yellow Leaves | Overwatering (most common); Natural aging of lower leaves; Underwatering; Nutrient deficiency | Check soil moisture; allow top inch to dry before watering again. Prune old, yellowing lower leaves. If underwatering, establish a more consistent schedule. If plant hasn’t been fed in a long time, apply a diluted balanced fertilizer. |
Curled Leaves | Underwatering; Too much direct sunlight | Water thoroughly. The leaves should uncurl once rehydrated. Move the plant away from direct sunbeams to a location with bright, indirect light. |
Black or Brown Spots | Fungal or bacterial disease (often from overwatering); Sun scorch (large patches); Pest damage | Improve air circulation and reduce watering frequency. Prune affected leaves. If large brown patches appear, move plant out of direct sun. Inspect for pests and treat with neem oil if present. |
No Flowers | Insufficient light (most common); Plant is too young or too old; Improper feeding; Cool temperatures | Move to a brighter location with indirect light. Be patient if the plant is young (1-3 years). Feed with a balanced, diluted fertilizer during the growing season. Ensure temperatures are consistently above 65°F (18°C). |
Pest and Disease Management
A healthy, well-cared-for Peace Lily is naturally resilient to many problems. Most diseases that affect these plants are not random afflictions but are direct consequences of an improper environment, particularly one that is overly wet and stagnant. By following the best practices for watering, soil, and air circulation outlined in this guide, a grower is already creating an environment that is hostile to most common pathogens.
Common Pests:
Peace Lilies are not particularly prone to pests, but infestations can occur. The most common culprits are sap-sucking insects:
- Mealybugs: These appear as small, white, cottony masses on the stems and in the crevices where leaves join the base.
- Spider Mites: These tiny arachnids are difficult to see with the naked eye but create fine webbing between leaves and cause stippled, discolored spots on the foliage. They thrive in dry conditions.
- Aphids: Small, pear-shaped insects that cluster on new growth.Treatment: For minor infestations, wipe the pests off with a cotton swab dipped in rubbing alcohol. For more widespread issues, treat the plant with insecticidal soap or neem oil, ensuring to thoroughly coat all surfaces of the leaves and stems, including the undersides. Repeat treatments may be necessary.
Common Diseases:
The most prevalent diseases are fungal and bacterial, almost always linked to overwatering and poor air circulation.
- Root Rot: Caused by various soil-borne fungi (like Cylindrocladium and Phytophthora) that thrive in anaerobic, waterlogged soil. Symptoms include wilting (even when the soil is wet), yellowing leaves, and a foul smell from the soil. The only remedy is to repot the plant immediately, trimming away all black, mushy roots with sterilized shears before planting in fresh, well-draining soil.
- Fungal Leaf Spot: Diseases like Myrothecium can cause brown or black spots on the leaves, sometimes with a yellow halo. These are spread by splashing water.Prevention and Management: Prevention is the best strategy. Always water the soil, not the foliage. Provide good air movement around the plant. If leaf spots appear, prune off the affected leaves immediately to prevent the spread of spores and correct any underlying watering issues.
Expanding Your Collection: Propagation by Division
The Peace Lily propagates through division, a simple process that is best performed in the spring when the plant is actively growing, often in conjunction with repotting. This is not just an optional activity for creating new plants; it is a necessary maintenance task for a mature, overgrown Peace Lily. As the plant grows, its rhizomatous root system sends up new crowns of leaves, often called “suckers” or “offshoots”. Over time, this can lead to a crowded, root-bound plant that struggles to absorb enough water and nutrients, resulting in frequent wilting and diminished health. Dividing the plant every few years rejuvenates it and provides new plants to expand a collection or share with others.
The step-by-step process is as follows:
- Remove the Plant: Carefully take the entire plant out of its pot.
- Expose the Roots: Gently massage the root ball to remove most of the old soil. This will allow a clear view of the root structure and the individual crowns.
- Identify and Separate Sections: Look for natural divisions where the plant has formed distinct clumps or crowns. Each viable division must have its own set of leaves and a healthy portion of the root system. Gently tease these sections apart with your hands. For tougher, more interconnected rhizomes, a clean, sharp knife may be used to make a clean cut between the sections.
- Replant the Divisions: Pot each new division into its own appropriately sized container (just large enough to accommodate the root ball) using a fresh, suitable potting mix. Follow the same post-repotting care guidelines: water thoroughly, place in lower light to recover, and withhold fertilizer for at least a month.
Part 5: Living with Your Peace Lily
A Note on Toxicity: Keeping Pets and Family Safe
One of the most critical pieces of information for any Peace Lily owner, especially those with pets, is a clear understanding of its toxicity. The plant’s name is dangerously misleading. While it is indeed toxic, it is imperative to distinguish it from true lilies of the Lilium and Hemerocallis genera (e.g., Easter lilies, Tiger lilies). Ingestion of any part of a true lily is extremely dangerous and can cause fatal kidney failure in cats.
The Peace Lily (Spathiphyllum) does not cause this type of severe systemic poisoning. Its toxicity comes from a different mechanism: all parts of the plant contain microscopic, needle-shaped, insoluble calcium oxalate crystals. When a person or animal chews on a leaf or stem, these sharp crystals embed themselves in the sensitive tissues of the mouth, tongue, and throat, causing immediate and intense pain and irritation.
Symptoms of ingestion in both pets and humans are typically immediate and localized to the mouth and GI tract. They include:
- Intense oral pain, burning, and irritation
- Pawing at the mouth (in pets)
- Excessive drooling
- Swelling of the tongue, lips, and throat
- Difficulty swallowing and temporary hoarseness
- Vomiting and nausea
Fortunately, severe reactions are rare. The intense initial pain usually prevents a child or pet from ingesting a large enough quantity to cause more serious problems, such as airway obstruction.
First Aid and Precautions:
If ingestion is suspected, remain calm.
- For Humans: Gently wipe out the mouth and offer cool liquids, ice chips, or a frozen treat like a popsicle to soothe the irritation. Do not force large amounts of fluid if there is significant swelling or difficulty swallowing. Contact a physician or Poison Control for guidance.
- For Pets: Offer a small amount of milk or yogurt to help precipitate the crystals and rinse the mouth. Contact a veterinarian or a pet poison control hotline immediately for professional advice.The best precaution is prevention. Place the Peace Lily in a location that is out of reach of curious children and pets.
Styling with Spathiphyllum: Integrating Elegance into Your Decor
The Peace Lily’s architectural form and elegant contrast of dark leaves and white blooms make it a versatile element in interior design. It can serve as a lush tabletop accent, a graceful floor plant in a living room corner, or a calming presence on a bedroom plant stand. The key to successfully integrating it into a decor scheme lies in choosing the right container.
This is where the cachepot system emerges as the perfect functional and aesthetic solution for the Peace Lily. A cachepot (from the French cacher, “to hide”) is a decorative outer pot that does not have drainage holes. This system directly addresses the plant’s non-negotiable need for excellent drainage while meeting the owner’s desire for a clean, stylish presentation without a messy plastic saucer.
The method is simple and highly effective:
- Keep the Peace Lily in its functional plastic nursery pot, which has ample drainage holes.
- Select a decorative cachepot that is slightly larger than the nursery pot. This can be a ceramic, metal, or woven basket container that complements the room’s decor.
- Simply place the nursery pot inside the cachepot. If the plant sits too low, a layer of pebbles or a small plastic riser can be placed in the bottom of the cachepot to elevate it.
- For watering, remove the inner nursery pot, take it to a sink for a thorough “drench and drain” watering, allow it to stop dripping completely, and then return it to the dry cachepot.
This two-pot system offers numerous benefits: it guarantees the plant will never sit in stagnant water, protects furniture and floors from water damage, makes the plant lighter and easier to move, and allows for effortless style changes by simply swapping out the decorative cachepot. Whether placed in a minimalist ceramic pot on a windowsill, a warm bamboo pot in the living room, or a textured basket to add softness to a bedroom, the cachepot system is the ultimate synthesis of the Peace Lily’s horticultural needs and its owner’s aesthetic goals.
The Air-Purifying Power of Peace Lilies: A Nuanced Look
A significant part of the Peace Lily’s modern fame stems from its inclusion in the 1989 NASA Clean Air Study. This landmark research, conducted in sealed laboratory chambers, found that Spathiphyllum was effective at removing common indoor volatile organic compounds (VOCs) from the air, including benzene, formaldehyde, and trichloroethylene. This finding has been a powerful marketing tool for decades, positioning the Peace Lily not just as a decorative object but as a functional air purifier.
An authoritative guide, however, must present this information with scientific responsibility and modern context. While the NASA study’s findings were valid within its controlled parameters, subsequent research has questioned the practical impact of houseplants on air quality in a typical home or office environment. A 2019 review published in the Journal of Exposure Science & Environmental Epidemiology concluded that the natural air exchange rate in a normal building dilutes pollutants far more quickly and effectively than a few potted plants can absorb them. To replicate the effects seen in the sealed NASA chambers, one would need an impractically large number of plants—essentially turning a room into a dense jungle.
Therefore, the most accurate and honest conclusion is a balanced one. The Peace Lily does possess the biological mechanisms to absorb certain pollutants. However, its primary and most tangible benefits are aesthetic and psychological. Its presence can reduce stress, improve mood, and enhance focus, bringing a vital connection to nature indoors. One should acquire and cherish a Peace Lily for its undeniable beauty, its rich symbolism, and the sense of calm it brings to a space. Any minor contribution it makes to air purification should be regarded as a small, pleasant bonus rather than its primary function.


