To repot your spider plant without damaging its roots, choose a new pot that’s 1-2 inches larger and use well-draining soil. Water the plant before repotting to soften the soil. Gently wiggle the pot to loosen it, supporting the base of the plant. Once out, inspect the roots, trimming any that are mushy or blackened. Place the plant in the new pot, fill with soil, and water lightly. Happy plants show new growth, so keep an eye out!
Key Takeaways
- Soak the soil before repotting to soften it, making it easier to remove the plant without damaging roots.
- Gently wiggle the plant while supporting the base to avoid putting stress on the roots during extraction.
- Inspect roots carefully, trimming only unhealthy or overgrown ones to promote a balanced root system.
- Loosen soil around the edges of the pot before removal to facilitate a smoother extraction process.
- Choose a new pot that is slightly larger with drainage holes to ensure healthy root growth and prevent waterlogging.
Understanding When to Repot Your Spider Plant
Understanding when to repot your spider plant is essential for keeping it healthy and thriving. You’ll notice a few clear repotting signs, like roots emerging from the drainage holes or the plant becoming root-bound, where it seems cramped in its pot. Pay attention to its growth patterns; if your spider plant stops growing or shows yellowing leaves, it might be time for a fresh start. Ideally, you should repot every couple of years, especially during its active growing season in spring. By doing this, you give your plant the room it needs to flourish. Just watch for those signs, and your spider plant will reward you with vibrant, lush growth, creating a lovely atmosphere in your home. Additionally, using a well-draining potting mix will help ensure your spider plant thrives in its new environment.
Choosing the Right Pot and Soil
When you’re ready to repot your spider plant, choosing the right pot and soil is essential to its success. A well-selected pot not only enhances your plant’s growth but also its overall health. Here’s what to keep in mind:
- Pot size: Pick a pot that’s 1-2 inches larger in diameter than the current one. This gives your plant room to grow without overwhelming it.
- Drainage: Confirm the pot has drainage holes to prevent waterlogging.
- Soil type: Use a well-draining potting mix, ideally one designed for houseplants or a cactus blend.
- Material: Terracotta pots are great for airflow, while plastic pots retain moisture better.
With the right pot and soil, your spider plant will thrive!
Preparing Your Spider Plant for Repotting
Preparing to repot your spider plant is an exciting step in helping it grow strong and healthy, so let’s get started! First, you’ll want to choose a cozy location where you can work comfortably without distractions. Make sure it’s well-lit but not in direct sunlight, as that can stress your plant. Next, gather your tools—scissors, a new pot, fresh soil, and a small trowel will do the trick. Having everything within reach makes the process smoother and more enjoyable. Before you begin, take a moment to appreciate your spider plant’s beauty and growth. This connection will make repotting feel like a rewarding experience, setting the stage for your plant’s new adventure in its fresh home!
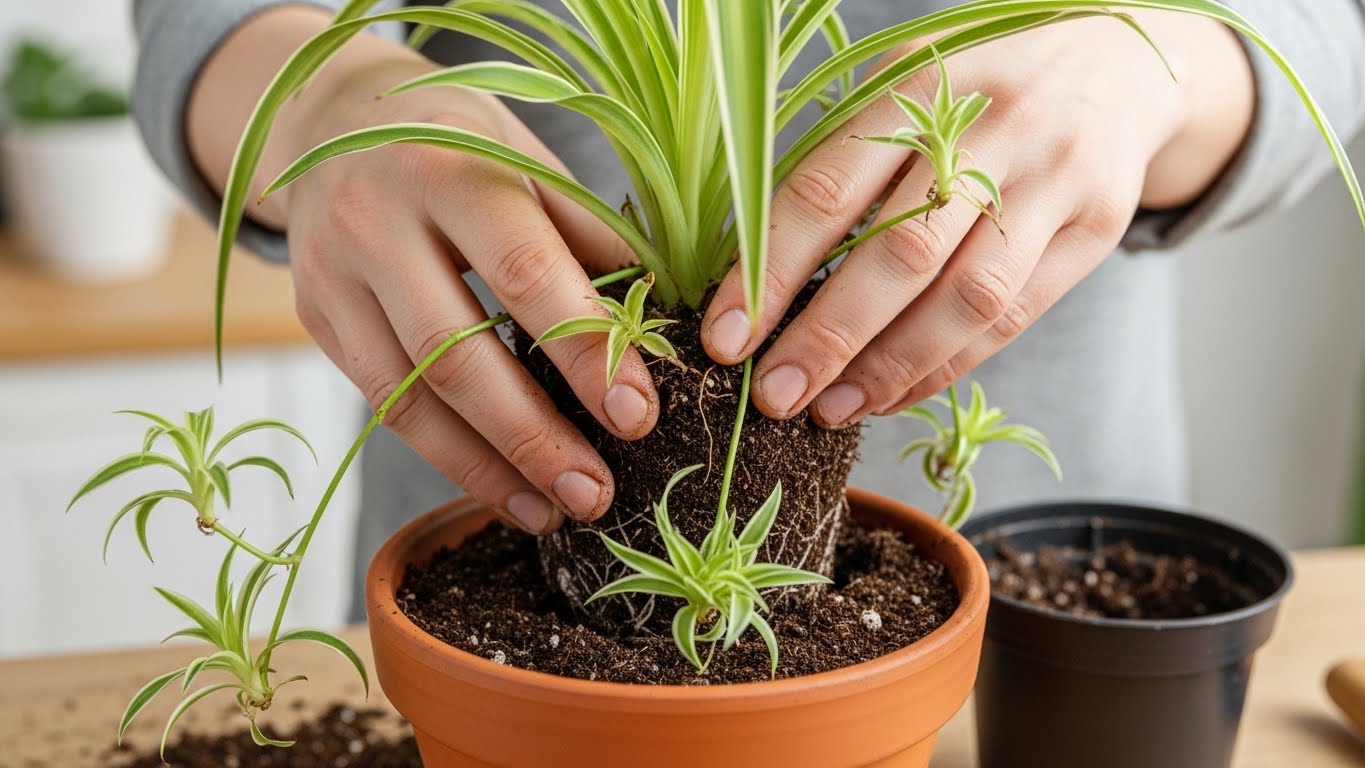
Removing the Spider Plant From Its Current Pot
Before you can repot your spider plant, you need to carefully remove it from its current pot. Start by checking if the roots are pot-bound, which means they’ve run out of space to grow. Once you’ve assessed the roots, gently loosen the soil around the edges to make the shift smoother for your plant.
Assessing Pot Bound Roots
Evaluating pot bound roots is an essential step in repotting your spider plant, and it can be quite an eye-opener! When you finally take it out of its pot, you’ll notice how the roots have grown tightly together, sometimes even circling the pot. This compactness can limit root growth and stunt your plant’s overall health. Here’s what to look for:
- Roots growing out of the drainage holes
- Soil that dries out quickly
- A noticeable lack of new leaves
- Roots that are thick, twisted, or dark
If you identify these signs, it’s time to choose a larger pot size. Giving your spider plant room to spread its roots means it’ll thrive even more, so let’s get started!
Gently Loosening Soil Edges
Gently loosening the soil edges is an essential step in removing your spider plant from its current pot, and it takes just a bit of care to do it right. First, consider using the soaking technique: water your plant thoroughly a day before repotting. This softens the soil, making it easier to work with. Carefully run your fingers along the edges of the pot, gently prying the soil away from the sides. If the roots feel stuck, don’t force them; instead, wiggle the plant gently while supporting the base for root protection. Once you feel it loosen, tilt the pot and let your spider plant slide out. You’re one step closer to giving it a fresh new home!
Inspecting and Pruning the Roots
Now that you’ve got your spider plant out of its pot, it’s time to check the roots. You’ll want to look for any dead or unhealthy roots that need trimming, as well as those that might be getting a bit too long. This inspection is essential for keeping your plant healthy and happy in its new home!
Examine Root Health
When you’re ready to repot your spider plant, examining its root health is a crucial step you don’t want to skip. Healthy roots mean a thriving plant, so take a moment to check its root structure carefully. Here’s what to look for:
- Firmness: Healthy roots should feel firm and resilient.
- Color: Look for light tan or white roots; dark or mushy roots indicate trouble.
- Growth: Notice if the roots are densely packed; this might mean it’s time to repot.
- Length: Long roots can be a sign of a happy plant, but they shouldn’t be tangled or circling.
Remove Dead Roots
To keep your spider plant thriving, it’s essential to remove any dead roots during the repotting process. Start by gently loosening the soil around the roots, taking care not to tug too hard. As you expose the roots, look for any that are mushy, blackened, or shriveled—these indicate root rot and need to go. Using clean, sharp scissors, trim away the dead roots, focusing on maintaining the healthy ones. Remember, healthy roots are vital for your plant’s growth and stability. By removing the dead roots, you’re improving the overall root health, allowing your spider plant to flourish in its new home. Trust me, your plant will thank you for this extra care!
Trim Overgrown Roots
Inspecting and pruning the roots of your spider plant is an essential step in ensuring its continued health and growth. When roots become overgrown, they can crowd the pot, leading to poor drainage and unhealthy growth. Here’s how to tackle root pruning:
- Gently remove the plant from its pot.
- Examine the roots, looking for any that are tangled or excessively long.
- Use clean, sharp scissors or pruning shears to trim back those overgrown roots.
- Aim for a balanced root system to promote healthy growth.
Placing the Plant in the New Pot
Placing your spider plant in its new pot is an exciting step in its repotting journey! Start by gently positioning the plant in the center of the pot, ensuring it’s at the same soil level as before. This helps the roots feel right at home. As you lower the plant in, take care to spread out the roots a bit; this will help stabilize them in their new environment. You might find it useful to hold the plant steady with one hand while using the other to adjust the roots. Remember, a well-placed plant is the foundation for healthy growth, so take your time. Your spider plant will thank you for this loving attention as it settles in!
Filling in With Fresh Soil
With your spider plant securely positioned in its new pot, it’s time to fill in the gaps with fresh soil. This step is essential for ensuring your plant thrives, so keep in mind the right soil composition. You’ll want a blend that drains well but still retains moisture. Here are some potting techniques to follow:
- Gently press the soil around the roots, avoiding any hard packing.
- Leave about an inch of space at the top of the pot for watering.
- Mix in perlite or vermiculite for extra aeration.
- Water lightly after filling to help settle the soil.
Taking these steps will provide a cozy home for your spider plant—your green buddy will thank you!
Watering and Caring for Your Repotted Spider Plant
Once you’ve repotted your spider plant, it’s essential to give it the right care to help it adjust to its new home. Pay attention to your watering frequency; let the top inch of soil dry out before giving it a drink. Too much water can lead to root rot, so be gentle. Your spider plant’s nutrient requirements are also important. Use a balanced fertilizer every 4-6 weeks during the growing season to keep it healthy and vibrant.
Care Aspect | Recommendation |
|---|---|
Watering Frequency | Allow top inch of soil to dry |
Fertilizer Type | Balanced (N-P-K) |
Fertilizing Schedule | Every 4-6 weeks |
Soil Moisture | Slightly moist, not soggy |
Light Conditions | Bright, indirect sunlight |
Caring for your spider plant can be a rewarding experience!
Signs That Your Spider Plant Is Thriving After Repotting
How can you tell if your spider plant is really thriving after repotting? Look for these growth indicators that show your plant’s on the right track:
- New shoots: Fresh green leaves popping up means it’s happy in its new home.
- Healthy foliage: Vibrant, undamaged leaves indicate your plant’s thriving.
- Root growth: If you see roots peeking out of the drainage holes, that’s a good sign!
- Increased spiderettes: More little “baby” plants mean your spider plant is feeling great and ready to spread.
These signs will help you feel connected to your plant’s journey, showing you that your care and attention are paying off. Enjoy watching your spider plant flourish!
Conclusion
Repotting your spider plant can be a fun and rewarding experience that helps it thrive in its new home. Did you know that spider plants can produce over 100 baby plants in a single growing season? That’s a lot of new greenery! By following the steps outlined, you’re ensuring your plant has the best chance to flourish. Keep an eye on it after repotting, and with some care, you’ll see it grow stronger and healthier than ever!


