If your peace lily’s roots are popping out of the drainage holes, or if you notice yellowing leaves, it’s time to repot! Choose a pot that’s 1-2 inches larger, with drainage holes. Spring is the best time to make the switch. First, gently remove the plant, check the roots, and place it in the new pot with fresh soil. Water it when the top inch feels dry, and you’ll keep your plant thriving. There’s more to learn!
Key Takeaways
- Repot your peace lily when roots emerge from drainage holes or growth stalls, typically in spring or fall.
- Choose a pot 1-2 inches larger with drainage holes and use a well-draining potting mix.
- Gently remove the plant, inspecting for pests and damaged roots before placing it in the new pot.
- Fill around the roots with soil, packing lightly to provide support without suffocating the roots.
- Water appropriately, maintaining consistent humidity and monitoring light conditions for optimal growth and health.
Signs Your Peace Lily Needs Repotting
When you look at your peace lily, it might not always be obvious that it’s time for a little change of scenery, but there are clear signs that can help you figure it out. First, check its root health; if roots are popping out of the drainage holes, it’s a sure indicator your plant needs more space. Also, if your peace lily stops producing those lovely blooms or shows stunted growth, that’s another growth indicator. You might notice yellowing leaves or a general lack of vigor, too. These signs suggest it’s time to repot, giving your beloved plant a fresh start. Keeping an eye on these details will guarantee your peace lily thrives in its new home. Additionally, ensuring proper drainage during repotting is crucial to prevent root suffocation and promote healthy growth.
Choosing the Right Pot and Soil
How do you choose the perfect pot and soil for your peace lily? Selecting the right pot and soil is essential for your plant’s health. Start by picking a pot that’s 1-2 inches larger in diameter than the current one, allowing room for growth. Make certain it has drainage holes; this prevents water from pooling at the bottom and causing root rot.
Choosing the right pot and soil is crucial for your peace lily’s health and growth.
Consider using a well-draining potting mix that retains moisture but allows excess water to escape. Here are some tips to keep in mind:
- Choose a pot size that accommodates your plant’s roots.
- Confirm the pot has adequate drainage holes.
- Use a high-quality, well-draining potting soil.
With the right pot and soil, your peace lily will thrive!
Timing Your Repotting
Timing your repotting is essential for keeping your peace lily healthy and thriving. You’ll want to look for signs that your plant is root bound, such as roots growing out of the drainage holes or a plant that seems to be stunted in growth. Additionally, seasonal repotting guidelines can help you choose the best time, typically in spring when your plant is ready to grow actively again.
Signs of Root Bound
As you nurture your Peace Lily, keep an eye out for signs that it might be root bound, because catching this early can make a big difference in your plant’s health and growth. When your plant outgrows its pot size, the roots can become cramped, leading to poor root health. Here are some signs to watch for:
- Roots growing out of the drainage holes: This indicates the roots are seeking more space.
- Stunted growth: If your Peace Lily isn’t thriving, it might need a bigger home.
- Yellowing leaves: This can signal stress from being root bound.
Seasonal Repotting Guidelines
Once you’ve recognized the signs that your Peace Lily is root bound, it’s time to contemplate when to repot. Ideally, you should aim for spring care, right as the growing season kicks off. This timing allows your plant to settle in and thrive. Spring’s warmth and increased light help your Peace Lily adjust quickly to its new home.
However, if you miss that window, don’t sweat it! Fall maintenance is another good option. While the plant slows down, repotting in early fall gives it a chance to prepare for winter, ensuring it’s cozy and ready to rest. Just remember, always choose a pot that’s 1-2 inches larger, providing plenty of room for those enthusiastic roots to spread!
Preparing for Repotting
Before you get started with repotting your Peace Lily, you’ll want to make certain you have all the right supplies on hand. Choosing the right soil and selecting a new pot that’s just a bit bigger can make a big difference in your plant’s health. Plus, timing your repotting can guarantee your Peace Lily thrives in its new home, so let’s explore these key points!
Choosing the Right Soil
When you’re gearing up to repot your Peace Lily, picking the right soil is like choosing the perfect outfit for a big day—it sets the stage for success! You’ll want to focus on soil types that promote healthy growth while ensuring moisture retention. A well-draining mix is key to keeping those roots happy.
Here are some great options to evaluate:
- Potting Mix: A balanced potting soil designed for houseplants works wonders.
- Coconut Coir: This helps retain moisture while providing aeration, ideal for your Peace Lily.
- Perlite: Adding perlite can improve drainage and keep the soil light.
Choosing the right soil is essential for giving your Peace Lily the best chance to thrive!
Selecting a New Pot
Selecting the right pot for your Peace Lily is essential, and there are a few key factors you should consider to make certain your plant thrives. First, choose a pot size that allows for growth; a pot that’s too small can stunt your Peace Lily. In addition, verify your new pot has drainage holes to prevent water from pooling, which can lead to root rot.
Factor | Ideal Choice | Why It Matters |
|---|---|---|
Pot Size | 1-2 inches larger | Room for root growth |
Drainage Holes | At least 3 holes | Prevents root rot |
Material | Clay or plastic | Affects moisture levels |
With these in mind, you’ll set your Peace Lily up for success!
Timing for Repotting
Timing is essential for repotting your Peace Lily, especially if you want to see it flourish. Knowing when to repot can make all the difference in its health. Keep an eye on these key indicators to determine the right time:
- Roots are poking out of the drainage holes or circling the pot.
- Growth has slowed down or stopped, signaling it’s too cramped.
- Soil dries out too quickly, indicating it’s time for fresh nutrients.
Consider your plant’s repotting frequency, which usually falls every 1-2 years, but remember to factor in environmental factors like light and humidity. By paying attention to these cues, you’ll help your Peace Lily thrive in its new home!
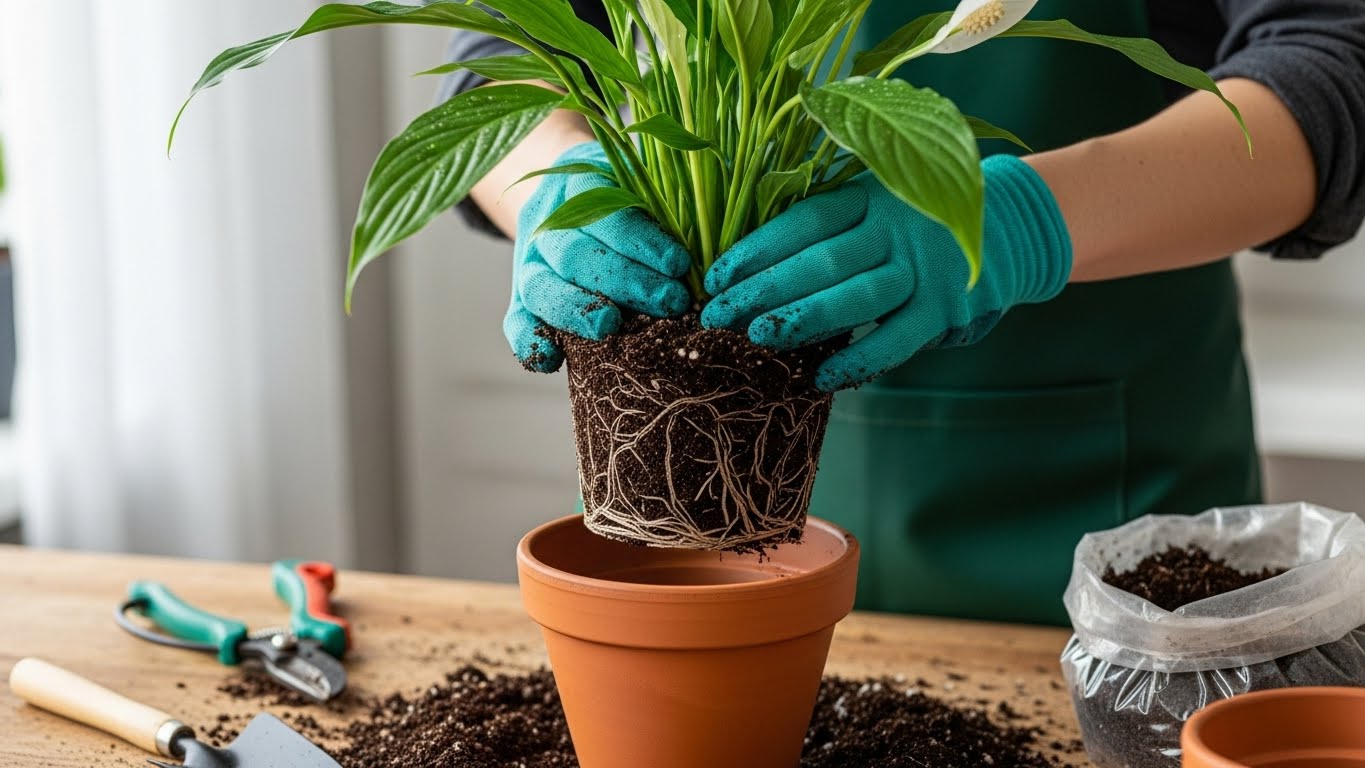
Step-by-Step Repotting Process
Repotting your Peace Lily can seem like a challenging task, but with the right steps, it becomes a rewarding experience that helps your plant thrive. Follow these simple repotting techniques to guarantee your plant’s happiness:
Step | Action | Notes |
|---|---|---|
1. Prepare | Gather materials | New pot, soil, tools |
2. Remove | Take out the plant | Gently loosen roots |
3. Inspect | Check for pests | Remove damaged roots |
4. Pot | Place in new container | Guarantee good pot drainage |
5. Fill | Add soil around roots | Pack lightly for support |
Aftercare for Your Repotted Peace Lily
Once you’ve successfully repotted your Peace Lily, the fun doesn’t stop there; in fact, the aftercare is just as important for helping your plant adjust to its new home. To guarantee your Peace Lily thrives, focus on these key aspects:
- Watering Schedule: Make sure to keep a consistent watering schedule, allowing the top inch of soil to dry out before watering again.
- Nutrient Balance: After a few weeks, start adding a balanced liquid fertilizer to support growth, ensuring your plant gets the nutrients it needs.
- Humidity Levels: Peace Lilies love humidity, so misting the leaves or placing a tray of water nearby can help create a cozy environment.
With attentive care, your Peace Lily will flourish in its new pot!
Tips for Maintaining a Healthy Peace Lily
Maintaining a healthy Peace Lily is essential for keeping your plant vibrant and blooming, so let’s explore some practical tips that’ll help you succeed! First, pay attention to its water requirements. Peace Lilies prefer to be watered when the top inch of soil feels dry; overwatering can lead to root rot, while underwatering can cause drooping leaves. Next, consider its light preferences. These beauties thrive in bright, indirect light but can adapt to lower light conditions. Just avoid direct sunlight, as it can scorch the leaves. Finally, don’t forget to dust the leaves occasionally to help them breathe and stay healthy. By following these tips, you’ll keep your Peace Lily flourishing and full of life!
Conclusion
Repotting your peace lily isn’t just a chore; it’s a chance to give your plant a fresh start! Imagine this: you’ve got a peace lily that’s been struggling in a cramped pot, and after repotting, it bursts with vibrant blooms, filling your room with joy. By following the steps we’ve covered, you’ll guarantee your peace lily thrives for years to come. So, roll up your sleeves, and enjoy the rewarding journey of nurturing your green friend!


