To propagate snake plants, start by taking healthy leaf cuttings about 4 to 6 inches long, cutting at a slight angle for better absorption. Plant these cuttings in well-draining soil and place them in indirect sunlight, watering lightly every few weeks. Alternatively, for division, cleanly cut the roots during spring, making sure to have sections with leaves. Replant these divisions in fresh soil, ensuring they get bright, indirect light. Stick around to discover more secrets for thriving snake plants!
Key Takeaways
- Choose healthy, mature leaves and cut them into 4 to 6-inch sections at a slight angle for better absorption during propagation.
- Place leaf cuttings upright in well-draining soil and water lightly while maintaining warm, indirect light conditions for rooting.
- Allow soil to dry out between waterings, providing water every 2-3 weeks to avoid root rot during the growth phase.
- For division, separate sections with leaves and roots during spring or early summer, replanting them in well-draining potting mix.
- Monitor rooted cuttings for growth and apply diluted fertilizer monthly after a month of establishment to encourage healthy development.
Understanding Snake Plants
Snake plants, also known as Sansevieria or mother-in-law’s tongue, are fascinating houseplants that can brighten up any space. Their origins trace back to Africa, where they grow in diverse climates, showcasing their resilience. You might be surprised to learn there are several snake plant varieties, each with unique characteristics. For instance, the popular ‘Laurentii’ boasts striking yellow edges, while the ‘Moonshine’ features silvery-green leaves that add a touch of elegance. These hardy plants thrive on neglect, making them perfect for busy households. Plus, they can adapt to low light, which makes them versatile companions. Understanding their origins and varieties can deepen your appreciation for these stunning plants, turning your home into a vibrant green sanctuary. Additionally, their ability to utilize Crassulacean Acid Metabolism for efficient water use makes them particularly well-suited to survive in drought conditions.
Benefits of Propagating Snake Plants
Propagating snake plants isn’t just a fun project; it comes with some great perks! You’ll save money by expanding your plant collection without buying new ones, plus these hardy plants help improve the air quality in your home. And let’s not forget, adding more greenery can really enhance your space, making it look stylish and inviting!
Cost-effective Plant Expansion
When you decide to expand your collection of plants, propagating snake plants can be a fantastic and cost-effective option. Instead of splurging on new plants, you can use cost-efficient methods like leaf cuttings or division. This not only saves you money but also allows you to connect with your plants in a more personal way. Watching your new snake plants grow from just a small cutting is incredibly rewarding and makes your collection feel even more special. Plus, sharing your propagated plants with friends can deepen your bond with them, turning a simple hobby into a shared experience. So, immerse yourself in the world of propagation, and enjoy the thrill of expanding your collection without breaking the bank!
Enhanced Air Quality
Adding snake plants to your home not only beautifies your space but also greatly improves the air quality. These resilient plants excel at air purification, filtering out harmful toxins and releasing fresh oxygen. You’ll love knowing that your snake plants are working hard to create a healthier environment for you and your family.
Moreover, snake plants help regulate indoor humidity, making your living space feel more comfortable. They release moisture into the air, which can be especially beneficial during dry seasons. By propagating snake plants, you’re not just expanding your plant collection; you’re also investing in a cleaner, fresher atmosphere. So, whether you’re a seasoned plant parent or just starting out, you’re making a fantastic choice for both beauty and health!
Aesthetic Home Decor
Snake plants are not just great for air quality; they also make a stunning addition to your home decor. By propagating these lovely plants, you can create beautiful decorative arrangements that bring warmth and life to your space. Imagine how delightful it is to style your home with lush greenery, enhancing your environment while showcasing your personal taste.
Here’s how propagating can elevate your decor:
Benefit | Description |
|---|---|
Unique Focal Points | Create eye-catching displays. |
Versatile Styling | Fit any room or theme. |
Personal Touch | Reflect your personality. |
With their striking appearance, snake plants can transform any area, making your home feel inviting and cozy. Embrace the art of plant styling today!
Tools Needed for Propagation
When you’re ready to propagate your snake plants, having the right tools makes all the difference. You’ll need some essential supplies to guarantee success, from pots to soil, so let’s look at what you should have on hand. With the right gear, you can easily start your propagation journey and watch new plants thrive!
Essential Tools Overview
To successfully propagate snake plants, you’ll need a few essential tools that can make the process smooth and enjoyable. First, gather a sharp knife or scissors—this will help you make clean cuts when taking leaf cuttings. You’ll also want a clean cutting board to protect your surfaces. Don’t forget to have a small container of water ready; it’s perfect for keeping cuttings fresh while you work. A measuring cup is handy for ensuring the right amount of water if you decide to use soil for propagation. Finally, a pair of gloves can protect your hands while adding a bit of flair to your gardening adventure. With these propagation essentials, you’re all set to give your snake plants a new life!
Recommended Potting Supplies
Getting your snake plant cuttings rooted and thriving requires more than just sharp tools; the right potting supplies play a significant role in their success. First, you’ll need high-quality potting soil designed for succulents or cacti. This type of soil drains well, preventing root rot. Also, remember to choose pots with drainage holes—this is essential for allowing excess water to escape.
Supply | Purpose |
|---|---|
Potting Soil | Provides nutrients and aeration |
Pot with Holes | Guarantees proper drainage |
Watering Can | Helps control moisture levels |
With these supplies, you’re well on your way to nurturing healthy snake plants. Enjoy the process, and watch your cuttings flourish!
Preparing for Leaf Cuttings
Before you plunge into taking leaf cuttings from your snake plant, it’s important to gather the right materials and create a suitable environment for your new plants. First, choose the ideal timing—spring or early summer is best, as the plant is actively growing. Next, select healthy, mature leaves that are free from pests or damage; this will give you the best chance at successful propagation. You’ll need a sharp, clean knife or scissors, a small pot with well-draining soil, and a clear plastic bag to maintain humidity. Once you’ve got everything ready, find a warm spot with indirect sunlight to help your cuttings thrive. With these preparations in place, you’re all set for the next steps!
Taking Leaf Cuttings
Taking leaf cuttings from your snake plant can be an exciting adventure in plant propagation, and it’s easier than you might think! First, focus on leaf selection; choose healthy, mature leaves that are vibrant and free from damage. Once you’ve made your choice, grab a sharp, clean knife and cut the leaves at a slight angle—this helps the cut surface absorb water better. Aim for sections about 4 to 6 inches long, as this length works best for rooting. Remember, a clean cut helps prevent rot, so take your time. Each cutting will grow into a new plant, giving you a chance to share your love for snake plants with friends or add to your collection. Happy propagating!
Allowing Cuttings to Callus
Once you’ve taken your leaf cuttings, it’s essential to allow them to callus before planting. This step is vital for proper drying and moisture management, helping your cuttings thrive in their new environment. By letting the cut ends dry out, you prevent rot and encourage healthy roots.
Here’s a quick reference to help you understand the process:
Step | Duration | Tips |
|---|---|---|
Cut the leaves | – | Use sharp scissors |
Drying period | 3-5 days | Keep in a warm, dry area |
Inspect cuttings | Daily | Look for shriveling edges |
Prepare soil | – | Use well-draining mix |
Ready to plant | After callusing | Verify cut ends are firm |
Let the magic of nature take its course!
Planting Leaf Cuttings
Now that your cuttings have had time to callus, it’s time to get them planted! You’ll want to choose healthy leaves, use proper cutting techniques, and understand the rooting process to guarantee success. Let’s explore these key steps that’ll help your snake plant thrive in its new environment!
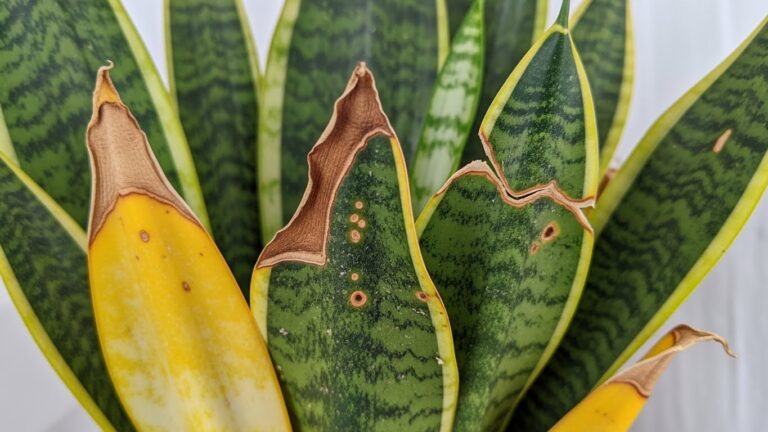
Choosing Healthy Leaves
When you’re ready to propagate your snake plant, selecting healthy leaves is essential for success. Start by examining the leaves for any signs of damage—look out for browning tips, discoloration, or spots. These can indicate poor leaf health, which may affect your propagation efforts. Choose firm, vibrant leaves that are free from pests and diseases. Healthy leaves will provide the best chance for successful growth, so prioritize those with a rich green color. Remember, your leaf selection will directly impact the new plants you create. Once you’ve picked the right leaves, you’re one step closer to watching your snake plant thrive. Happy propagating!
Cutting Techniques
Cutting techniques play an essential role in successfully propagating your snake plant through leaf cuttings. To guarantee you’re on the right track, follow these steps that focus on cutting angles and leaf health:
- Select Healthy Leaves: Choose plump, vibrant leaves free from any blemishes.
- Make Clean Cuts: Use a sharp, sterile knife or scissors to make your cuts, which helps prevent infection.
- Angle Your Cuts: Cut at a slight angle, about 45 degrees, to maximize surface area for future roots.
- Avoid Excessive Length: Keep your cuttings around 4-6 inches long, ensuring they have enough energy to thrive.
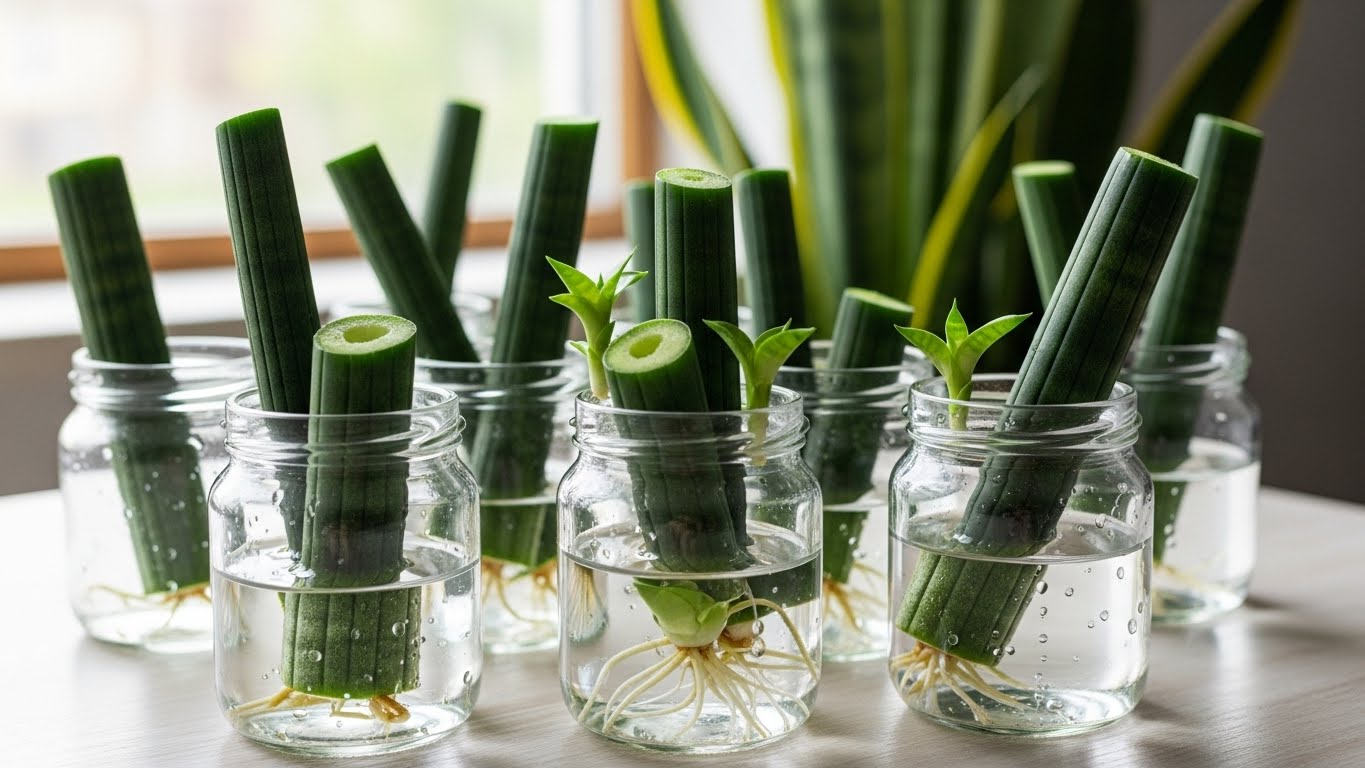
Rooting Process
After you’ve successfully made your leaf cuttings, the next exciting step is the rooting process, where those cuttings start to grow new roots and eventually become new plants. To kick off root growth, place your cuttings in a well-draining soil mix—make sure they’re standing upright in their pots. Water them lightly, just enough to keep the soil moist but not soggy. Keep your cuttings in a warm, bright spot, away from direct sunlight, as they need that gentle encouragement to thrive. In a few weeks, you’ll notice tiny roots forming, and that’s your sign of cutting success! Once they’ve established a solid root system, you can proudly transplant them into new pots, nurturing your growing snake plant collection.
Caring for Rooted Cuttings
Caring for rooted cuttings is an exciting step in growing your snake plants, and you’ll quickly see how rewarding it can be! To help your little plants thrive, follow these simple tips:
Caring for rooted cuttings is a rewarding journey in growing snake plants—watch them thrive with a little love!
- Light Requirements: Place your cuttings in bright, indirect light to promote healthy growth.
- Watering Schedule: Water them every 2-3 weeks, allowing the soil to dry out between waterings. Overwatering can lead to root rot!
- Temperature: Keep them in a warm environment, ideally between 60°F and 80°F (15°C to 27°C).
- Fertilizer: After a month, apply a diluted liquid fertilizer once a month to encourage strong roots.
With a little love and care, your snake plant cuttings will flourish!
Preparing for Division
Before you plunge into dividing your snake plants, it’s important to prepare properly to guarantee a smooth process and healthy new plants. Start by considering the timing; spring or early summer is ideal since your plant will be actively growing. This guarantees they’ll recover quickly. Next, focus on soil preparation. Use a well-draining potting mix, ideally one designed for succulents, to help prevent root rot. You might even mix in some sand or perlite for extra drainage. Gather your tools, like a clean, sharp knife or scissors, and make sure you have pots ready for the new divisions. With everything set, you’ll be ready to proceed with confidence, guaranteeing your snake plants thrive in their new homes.
Dividing Snake Plants
Dividing snake plants can be an exciting way to expand your indoor garden and share these resilient beauties with friends! To get started, use these simple dividing techniques for healthy divisions:
Dividing snake plants is a fun way to grow your indoor garden and share these hardy plants with others!
- Choose the Right Time: Spring is the best time for division, as your snake plant is actively growing.
- Prepare Your Tools: Grab a sharp knife or spade, and confirm it’s clean to avoid infections.
- Identify Sections: Look for clusters of leaves and roots, and decide where to cut for even divisions.
- Make Your Cuts: Carefully slice through the root system, ensuring each section has roots and leaves for a successful start.
Replanting Divided Sections
Now that you’ve successfully divided your snake plants into separate sections, it’s time to give them a new home! When replanting, focus on proper soil selection to guarantee strong roots. Use a well-draining potting mix, ideally designed for succulents, which allows excess water to escape. Here’s a helpful table to guide you:
Plant Section | Pot Size | Soil Type |
|---|---|---|
Small | 4 inches | Cactus mix |
Medium | 6 inches | Succulent blend |
Large | 8 inches | All-purpose mix |
When replanting techniques, gently place each section in its new pot, filling in with soil around the roots. Water lightly, and watch your plants thrive!
Ongoing Care for Propagated Plants
To keep your newly propagated snake plants thriving, you’ll need to focus on a few essential care tips that guarantee their continued growth. Ongoing maintenance is key to their health, so stick to a consistent watering schedule and watch for their needs. Here are four things to remember:
- Watering: Allow the soil to dry out between waterings, usually every 2-3 weeks.
- Light: Place your plants in indirect sunlight, which helps them grow without burning their leaves.
- Humidity: Snake plants prefer low humidity, so don’t worry about misting them.
- Fertilizing: Feed your plants with a balanced fertilizer every month during the growing season.
Conclusion
You’ve just revealed the secret to creating an indoor jungle with snake plants that could rival the Amazon rainforest. By using leaf cuttings or division, you’re not just expanding your plant collection, but also enhancing your space. Remember, patience is key as you nurture your new plants. With a little care and attention, you’ll soon enjoy vibrant greenery that purifies the air and brightens your home. Happy propagating!