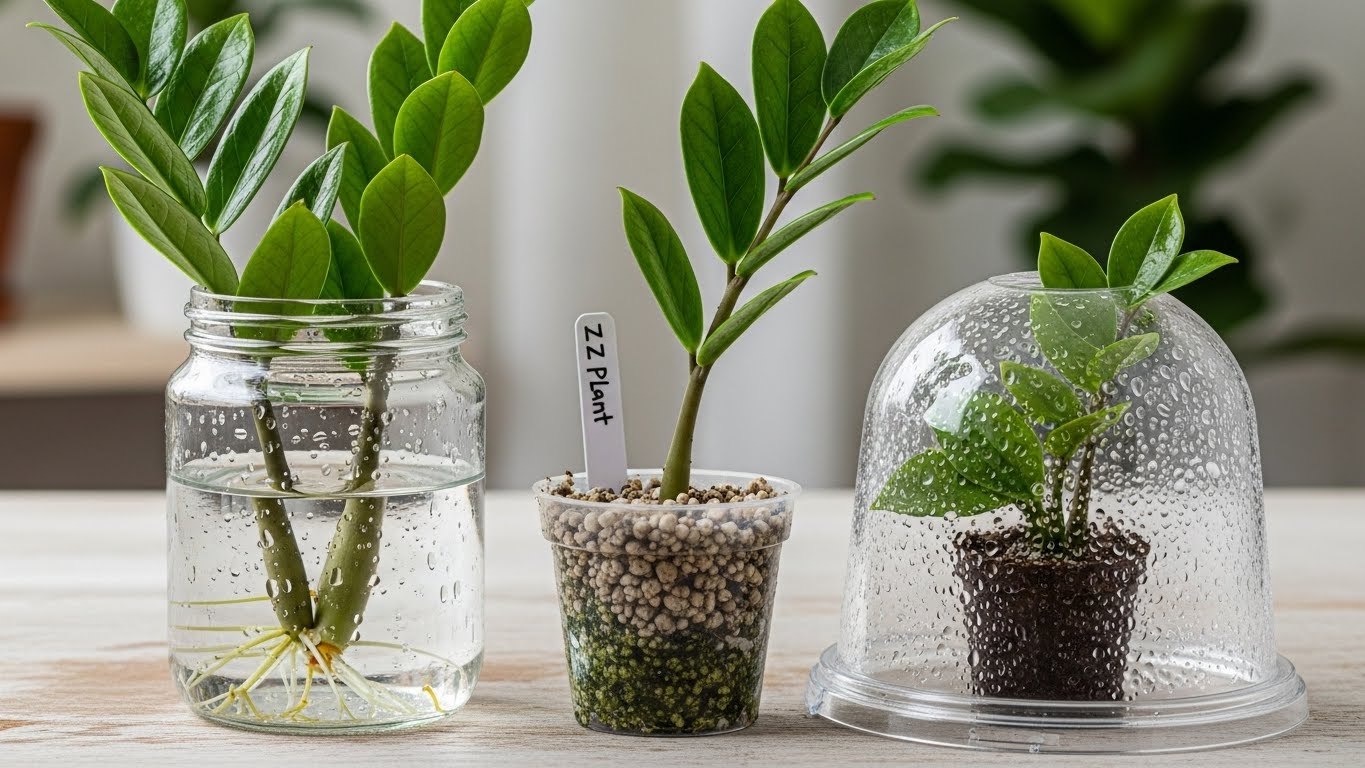
To propagate a ZZ plant, choose healthy leaves or divide the root system in spring or early summer. For leaf cuttings, cut sections and place them in well-draining soil, then keep them in bright, indirect light. If you’re dividing, carefully separate the roots and repot each section. Water once the soil’s dry to the touch, and apply fertilizer every few weeks. Soon, you’ll see new growth! There’s more to learn about aftercare and troubleshooting issues ahead!
Key Takeaways
- Choose spring or early summer for propagation when the ZZ plant is actively growing for best results.
- Use healthy leaves or root divisions; cut leaves into 3-4 inch sections or separate rooted stems.
- Prepare small pots with well-draining soil; insert cuttings or repot divided roots into fresh soil.
- Water lightly and place in bright, indirect light; avoid direct sunlight to prevent leaf burn.
- Monitor for new growth and maintain soil moisture while ensuring conditions remain warm and well-aerated.
Understanding the ZZ Plant
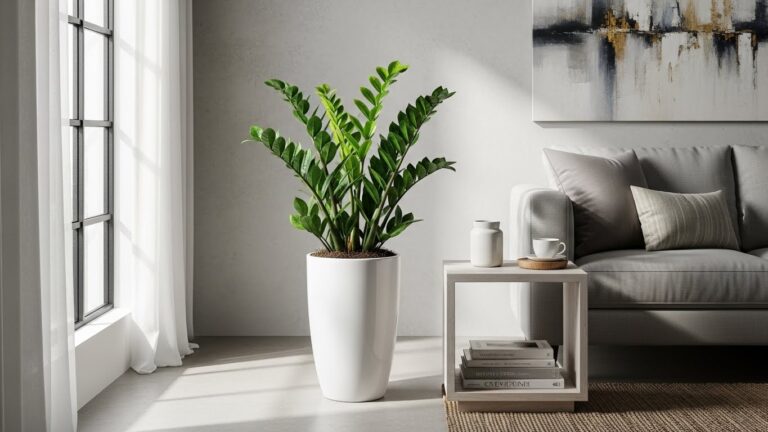
The ZZ plant, also known as Zamioculcas zamiifolia, is one of the most resilient houseplants you can own! With its glossy, dark green leaves and unique, upright growth, it adds a touch of elegance to any space. One of the best ZZ plant characteristics is its ability to thrive in low light and tolerate neglect, making it perfect for busy lifestyles. You’ll love how it doesn’t demand constant attention! For ZZ plant care, just water it every couple of weeks, allowing the soil to dry out completely between watering sessions. Keep it in well-draining soil, and don’t worry too much about humidity—this plant is quite forgiving. Additionally, the ZZ plant can store water in its underground rhizomes, allowing it to survive during drought periods. Embrace the ease of caring for your ZZ plant, and watch it flourish!
Benefits of Propagating ZZ Plants
Propagating ZZ plants offers plenty of exciting benefits that can enhance your gardening experience. First, the propagation benefits include giving you new plants to enjoy or share with friends, adding a personal touch to your home. It’s a fantastic way to expand your collection without spending money on new plants. Plus, when you propagate, you’re encouraging healthy growth in your existing ZZ plants, which boosts their overall plant health. By taking cuttings or dividing roots, you’re stimulating their natural vigor, leading to stronger, more vibrant plants. Additionally, watching your cuttings thrive is incredibly rewarding, as you witness the magic of nature firsthand. So, immerse yourself in propagation, and enjoy all the wonderful benefits it brings!
When to Propagate Your ZZ Plant
Knowing the right time to propagate your ZZ plant can make all the difference in its success. The ideal timing for propagation is typically during the spring or early summer when your plant is actively growing. This is when it’s ready to embrace new beginnings, just like you! Seasonal considerations are essential, as doing it during these warmer months provides the best chance for your cuttings to thrive. You’ll notice new growth emerging faster, which is always exciting. Avoid propagating in the fall or winter, as your ZZ plant will be resting and less likely to establish roots. Trust your instincts, and remember to enjoy the process; it’s all part of nurturing your green companion!
Tools You’ll Need for Propagation
Before you start propagating your ZZ plant, you’ll need to gather some essential tools to make the process smooth and successful. Having the right soil and potting options, along with proper watering equipment, can really help your new cuttings thrive. Let’s take a closer look at what you’ll need to get started on your propagation adventure!
Essential Propagation Tools
To successfully propagate a ZZ plant, you’ll need a few vital tools to make the process smooth and enjoyable. First, grab a sharp, clean knife or scissors for cutting those lovely stems. You’ll also want some small pots or containers for your new plants, as they’ll need their own space to flourish. Don’t forget a clean surface to work on; it’ll keep everything neat and tidy. For best results, have some fresh water nearby to help hydrate your cuttings. Finally, a light source is essential, so choose a spot where they can soak up some indirect sunlight. With these essential supplies in hand, you’re all set to explore various propagation techniques and watch your ZZ plant family grow!
Soil and Potting Options
Once you’ve gathered your tools and prepared for propagation, it’s time to think about soil and potting options that will give your new ZZ plant cuttings the best chance to thrive. The right soil types and potting materials can make a big difference!
Soil Types | Potting Materials | Benefits |
|---|---|---|
Well-draining | Plastic pots | Lightweight & durable |
Cactus mix | Terracotta pots | Breathable & moisture-absorbing |
Peat-based mix | Biodegradable pots | Eco-friendly option |
Perlite mix | Self-watering pots | Reduces watering chores |
Coconut coir | Hanging baskets | Stylish & space-saving |
Choosing the right combination guarantees your cuttings get enough air and moisture, setting the stage for healthy growth. Happy planting!
Watering Equipment Needed
When you’re ready to propagate your ZZ plant, having the right watering equipment can make all the difference in ensuring your cuttings thrive. First, grab a spray bottle for gentle misting; it helps maintain the right moisture levels without drowning your precious cuttings. Next, consider a measuring cup or small watering can for precise pouring, allowing you to control watering frequency. You’ll want to keep an eye on your plant’s needs, checking that the soil remains slightly damp but not soggy. Finally, a moisture meter can be a handy tool to check the soil’s moisture levels, giving you peace of mind. With these essentials in hand, you’re all set to nurture your ZZ plant cuttings!
Choosing the Right Method of Propagation
When it comes to propagating your ZZ plant, you’ve got a couple of great options to choose from: the leaf cuttings method and the division method. Each approach has its own perks, so it’s important to think about what works best for you and your plant. Let’s explore these methods to help you make the right choice for your propagation adventure!
Leaf Cuttings Method
If you’re looking to expand your indoor garden, the leaf cuttings method is an exciting and effective way to propagate a ZZ plant! This technique can lead to great propagation success if you follow some simple leaf cutting techniques. Here’s how to do it:
- Select healthy leaves: Choose mature, vibrant leaves from your ZZ plant.
- Cut the leaves: Use a sharp, sterilized knife to cut the leaves into sections, each about 3-4 inches long.
- Prepare the soil: Fill small pots with well-draining soil to support root growth.
- Plant and care: Insert the cuttings into the soil, water lightly, and place them in a warm, indirect light area.
With a little patience, you’ll see new growth in no time! Happy propagating!
Division Method
The division method is an exciting way to propagate your ZZ plant, especially since it allows you to create new plants while giving your existing one a little extra room to grow. This technique works best when your ZZ plant has outgrown its pot or produced multiple stems. To begin, gently remove the plant from its pot and shake off the excess soil. Next, carefully separate the roots, ensuring each section has a healthy root system. You can then repot these sections into their own pots with fresh soil. With this propagation technique, you not only expand your plant collection but also promote a healthier ZZ plant. It’s a win-win! So, grab your tools and get started on this fun journey!
Preparing the ZZ Plant for Propagation
Preparing your ZZ plant for propagation can be an exciting adventure, especially since these resilient houseplants are not only easy to care for, but also thrive in a variety of conditions. To get started with your propagation techniques, follow these simple steps:
- Choose a Healthy Stem: Look for a robust stem with several leaves.
- Clean Your Tools: Use sterilized scissors or a knife to prevent infections.
- Remove Excess Soil: Gently shake off the soil from the roots to avoid any damage.
- Prepare for Cutting: Place your ZZ plant in a well-lit spot for a few days to acclimate before propagation.
Leaf Cuttings: The Simple Method
Once you’ve prepared your ZZ plant and selected a healthy stem, it’s time to explore one of the easiest methods of propagation: leaf cuttings. Start by choosing a leaf with excellent leaf health—this is vital for successful growth. Using sharp cutting techniques, slice the leaf into sections, ensuring each piece has a vein running through it; this vein is essential for rooting. Place the cuttings in a well-draining soil mix, burying them just enough to secure them. Water them lightly and keep them in a warm, bright area, avoiding direct sunlight. In a few weeks, you’ll notice new growth sprouting from the cuttings, a sure sign that you’re on your way to growing new ZZ plants!
Dividing Rhizomes: A More Advanced Approach
Now that you’ve mastered leaf cuttings, it’s time to tackle a more advanced method: dividing rhizomes. Understanding the structure of these underground stems is key, as it’ll help you know exactly where to make your cuts. Plus, using the right tools and following proper aftercare will guarantee your new plants thrive.
Understanding Rhizome Structure
Dividing rhizomes can feel like starting on an exciting plant adventure, especially when it comes to the robust ZZ plant! Understanding rhizome anatomy is key to successful propagation techniques. The rhizomes are the thick, knobby structures that store nutrients and help the plant thrive. By diving into their structure, you’re setting the stage for growth.
Here’s what to look for:
- Thick, fleshy parts: These store water and nutrients.
- Nodes: Tiny bumps where new shoots can sprout.
- Roots: Thin extensions that absorb moisture and nutrients.
- Spacing: Make sure you leave enough space between divisions for healthy growth.
With this knowledge, you’re ready to begin your propagation journey!
Tools for Division
When you’re ready to tackle the exciting task of dividing your ZZ plant’s rhizomes, having the right tools can make all the difference. First, grab a sharp, clean knife or garden shears; this helps you make precise cuts without damaging the rhizomes. A sturdy potting mix is essential for replanting, ensuring your new divisions thrive. Don’t forget gloves; they protect your hands while you work. Finally, a small trowel can help you dig out the rhizomes gently. Using these tools effectively will enhance your propagation techniques and boost your plant’s health. Remember, every successful division opens up new possibilities for your ZZ plant collection, making it even more enjoyable! Happy propagating!
Aftercare Tips
After you’ve successfully divided your ZZ plant’s rhizomes, the real work begins with proper aftercare to guarantee your new plants thrive. Follow these essential tips to keep your ZZ plant happy:
- Watering: Allow the soil to dry out between waterings, ensuring you don’t overdo it.
- Light: Place your new plants in bright, indirect light for ideal growth.
- Fertilizer Options: Use a balanced houseplant fertilizer every 4-6 weeks during the growing season to give them a boost.
- Pest Management: Regularly inspect your plants for pests like spider mites or mealybugs, and treat with insecticidal soap if needed.
Planting Your Cuttings or Divisions
Once you’ve prepared your cuttings or divisions, it’s time to plant them in their new homes! Choose a pot size that fits your cutting comfortably, with enough room for growth. A small pot is often ideal, as it helps the roots establish themselves without overwhelming them. When you plant, make sure to dig a hole that’s about two inches deep—this is your planting depth. Place the cutting gently into the soil, ensuring that the base is covered but not buried too deep. Firm the soil around it to eliminate any air pockets, giving your cutting a cozy spot to settle in. Water it lightly, and you’re on your way to nurturing a beautiful ZZ plant!
Creating the Ideal Environment for Growth
Creating the ideal environment for your ZZ plant isn’t just about the right potting; it also involves setting the stage for growth with proper light, temperature, and humidity. Here’s what you need to keep in mind:
- Ideal Light: Place your ZZ plant in bright, indirect light; it thrives in low light, too!
- Temperature Range: Keep the temperature between 60°F to 75°F (15°C to 24°C) for peak growth.
- Humidity Levels: ZZ plants prefer average humidity, so a standard home environment works well; no need for a humidifier!
- Soil Composition: Use well-draining soil, like a cactus mix, to prevent root rot.
Watering and Care After Propagation
Watering your newly propagated ZZ plant is just as important as providing the right environment for it to grow strong. Make sure to check the soil moisture regularly, as overwatering can lead to root rot. Aim for a watering frequency of every 2-3 weeks, but adjust based on your plant’s needs. Keep an eye on humidity levels too; ZZ plants thrive in moderate humidity.
Care Aspect | Recommendation |
|---|---|
Watering Frequency | Every 2-3 weeks |
Humidity Levels | Moderate (40-60%) |
Light Conditions | Bright, indirect |
Temperature Range | 65°F – 85°F |
Fertilizing | Every 4-6 weeks |
With consistent care, your ZZ plant will flourish!
Signs of Successful Rooting
When you’re waiting for your ZZ plant cuttings to take root, it can feel like a game of patience, but there are some clear signs that indicate success is on the horizon. Look out for these rooting indicators that signal successful growth:
- New Growth: You might see fresh leaves starting to emerge.
- Firmness: Gently tug on the cutting; if it feels secure, roots are likely forming.
- Moisture: The soil should remain slightly damp, indicating the cuttings are absorbing water.
- Color Change: Healthy roots may show a slight color change, becoming whiter or creamier.
Once you notice these signs, you’ll know your ZZ plant is well on its way to thriving!
Troubleshooting Common Issues
Even with the signs of successful rooting you might spot, some issues can still pop up while propagating your ZZ plant. If you notice leaf yellowing, it could indicate overwatering signs or lighting issues. ZZ plants prefer bright, indirect light, so check where you’ve placed them. If the soil feels soggy, you might be dealing with root rot, which can be a real bummer! To prevent this, always use well-draining soil and let the pot dry out between waterings. Additionally, keep an eye out for pests. Regular pest management can save your plant from tiny invaders that may disrupt its growth. By staying alert, you’ll guarantee your ZZ plant thrives beautifully!
Transplanting Your New ZZ Plants
Transplanting your new ZZ plants is an exciting step that can help them grow even stronger! It’s essential to choose the right transplant timing and pot size for your new green friends. Here’s how to do it:
Transplanting ZZ plants is an exciting way to help them flourish; timing and pot size are key!
- Choose the Right Time: Wait until your plant has outgrown its current pot, usually every 1-2 years.
- Select a Pot: Pick a pot that’s 1-2 inches larger in diameter than the current one, ensuring good drainage.
- Prepare the Soil: Use a well-draining potting mix, as ZZ plants prefer it.
- Gently Transfer: Carefully remove the plant from its old pot, loosen the roots, and place it in the new pot.
Your ZZ plants will thrive in their new home!
Long-term Care for Your Propagated ZZ Plants
Taking care of your propagated ZZ plants is essential for their long-term health and happiness, so you’ll want to pay attention to their needs as they grow. Start by guaranteeing they receive bright, indirect light, as this promotes healthy leaves. Water your plants only when the soil feels dry to the touch, preventing overwatering, which can harm their roots. Fertilize every few months with a balanced houseplant fertilizer to support long-term growth. Keep an eye out for pests and wipe the leaves occasionally to keep them dust-free and vibrant. Finally, rotate your plants every so often to guarantee even sunlight exposure. By nurturing your ZZ plants this way, you’ll ensure their health and help them thrive for years to come!
Conclusion
To summarize, propagating a ZZ plant is a fun and rewarding process that can lead to beautiful new greenery for your home. Imagine taking a cutting from your thriving ZZ plant and watching it grow into a full, lush beauty, just like your friend Jenna did last spring—she ended up with three new plants to share! With the right tools and care, you can enjoy the satisfaction of expanding your plant family, so get started today!